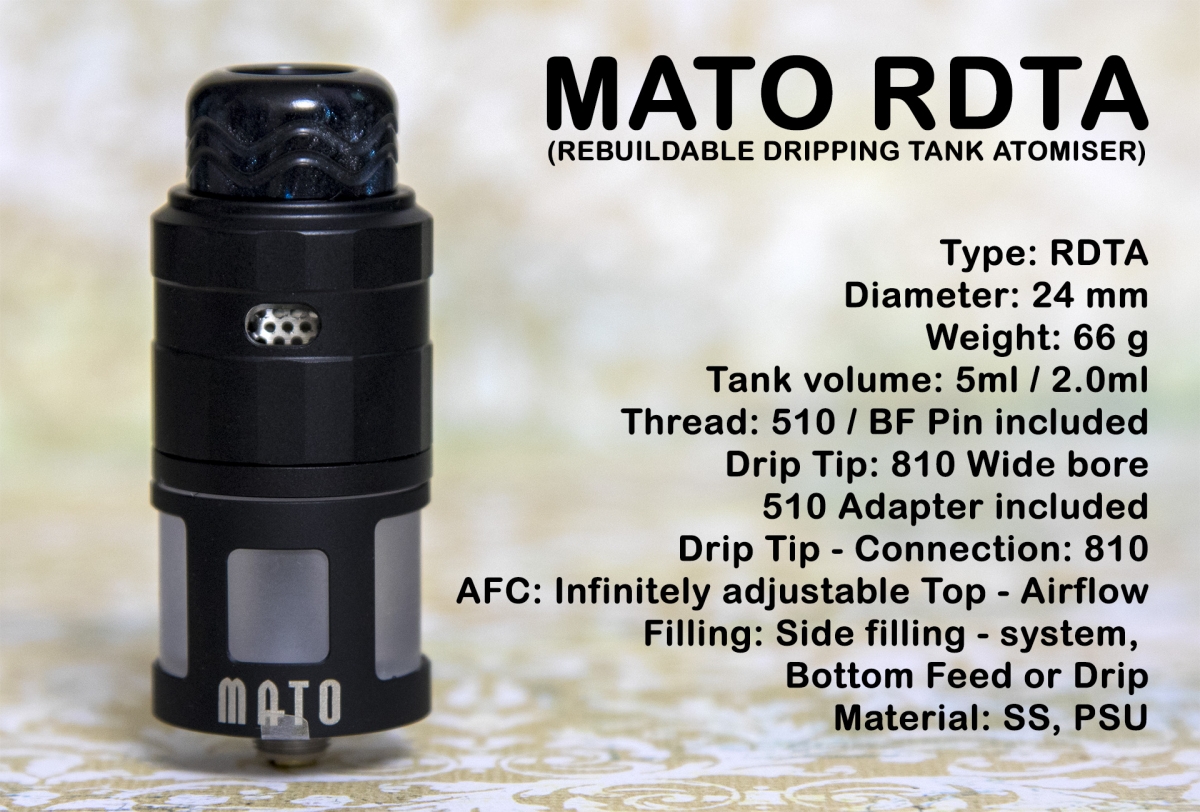
Vandy Vape Mato RDTA
We take a close look at the Vandy Vape Mato RDTA, a single coil tank which uses steel rope for superb wicking and great performance but does have a couple of niggles.
-
by Si Davies

Share on:

Provided by New Vaping for review purposes.
https://www.newvaping.com/products/vandy-vape-mato-rdta
Current price £35.99 but check for New Vaping discounts.
Introduction
For those unfamiliar with what an RDTA is, it stands for Rebuildable Dripping Tank Atomiser, basically it is an RDA fed from underneath via a tank of liquid instead of drip feeding or squonking. Wicked correctly, an RDTA gives a far more consistent vape than dripping or squonking in my opinion, I do love a decent RDTA. My previous favourites include; Vandy Vape PYRO V2, Wotofo Farris and the iJoy Combo SRDTA which are all dual coil, so I was interested to see if the single coil MATO brought anything new to the table.
Unboxing
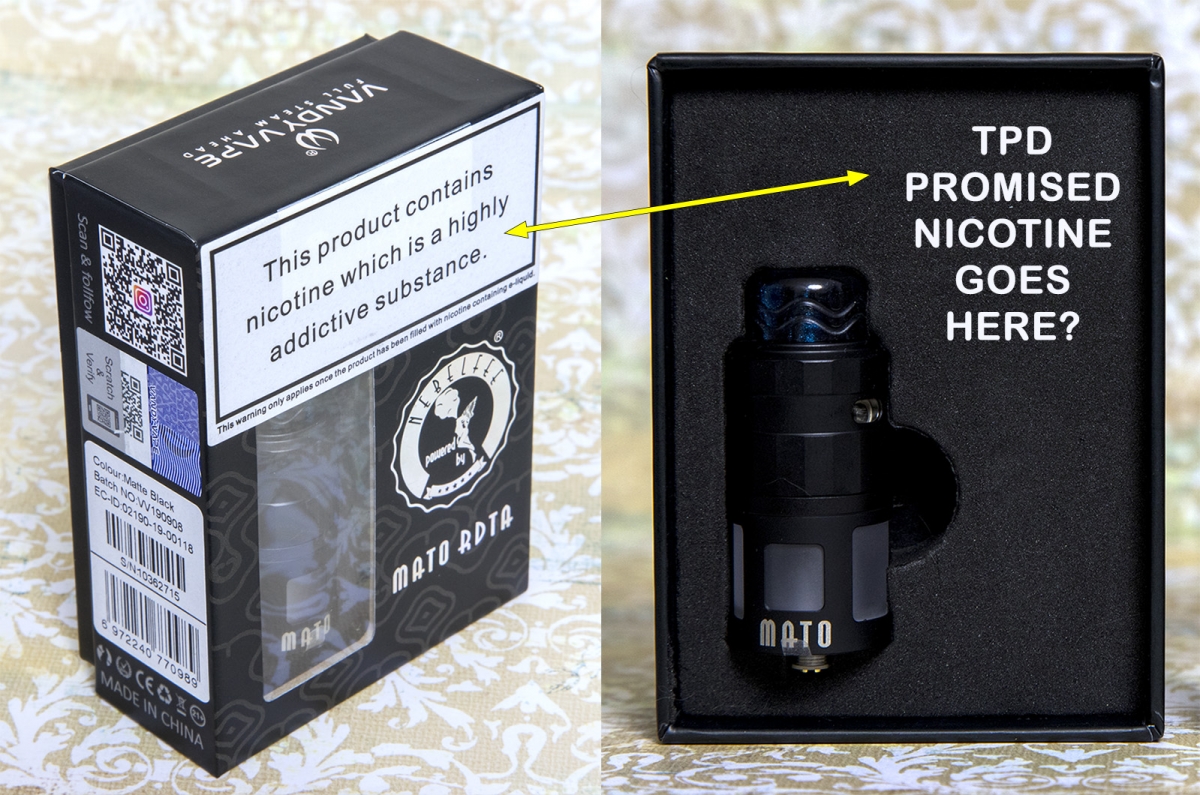
I was a bit underwhelmed with the packaging, it looks ok in the box but when you open up the top layer there’s f**k all there apart from the tank, just a big empty space that looks like its missing something. I’m left wondering if the non TPD version is different?
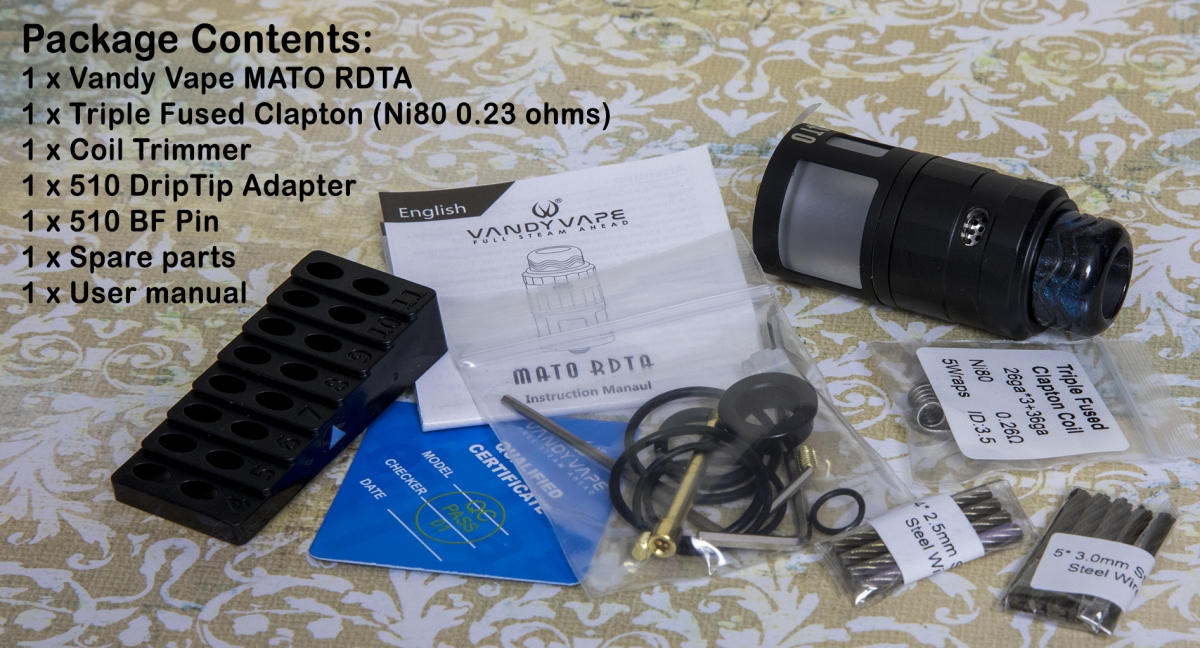
The bottom layer holds all the goodies and spares:
On first impression, it looks like there’s a lot of extras but later on you realise there’s something very wrong as you attempt to build it.
Assembly
The tank comes apart really easily yet is not too loose to accidentally come apart. Here’s a photo of the main bits:
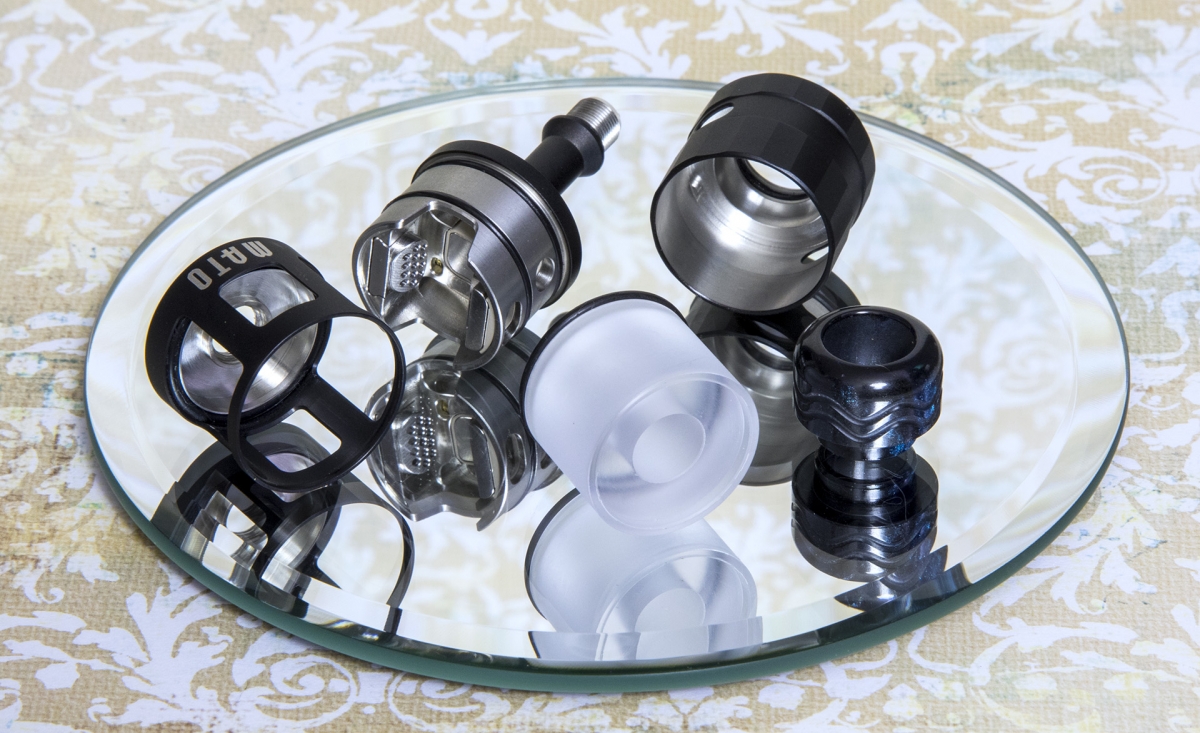
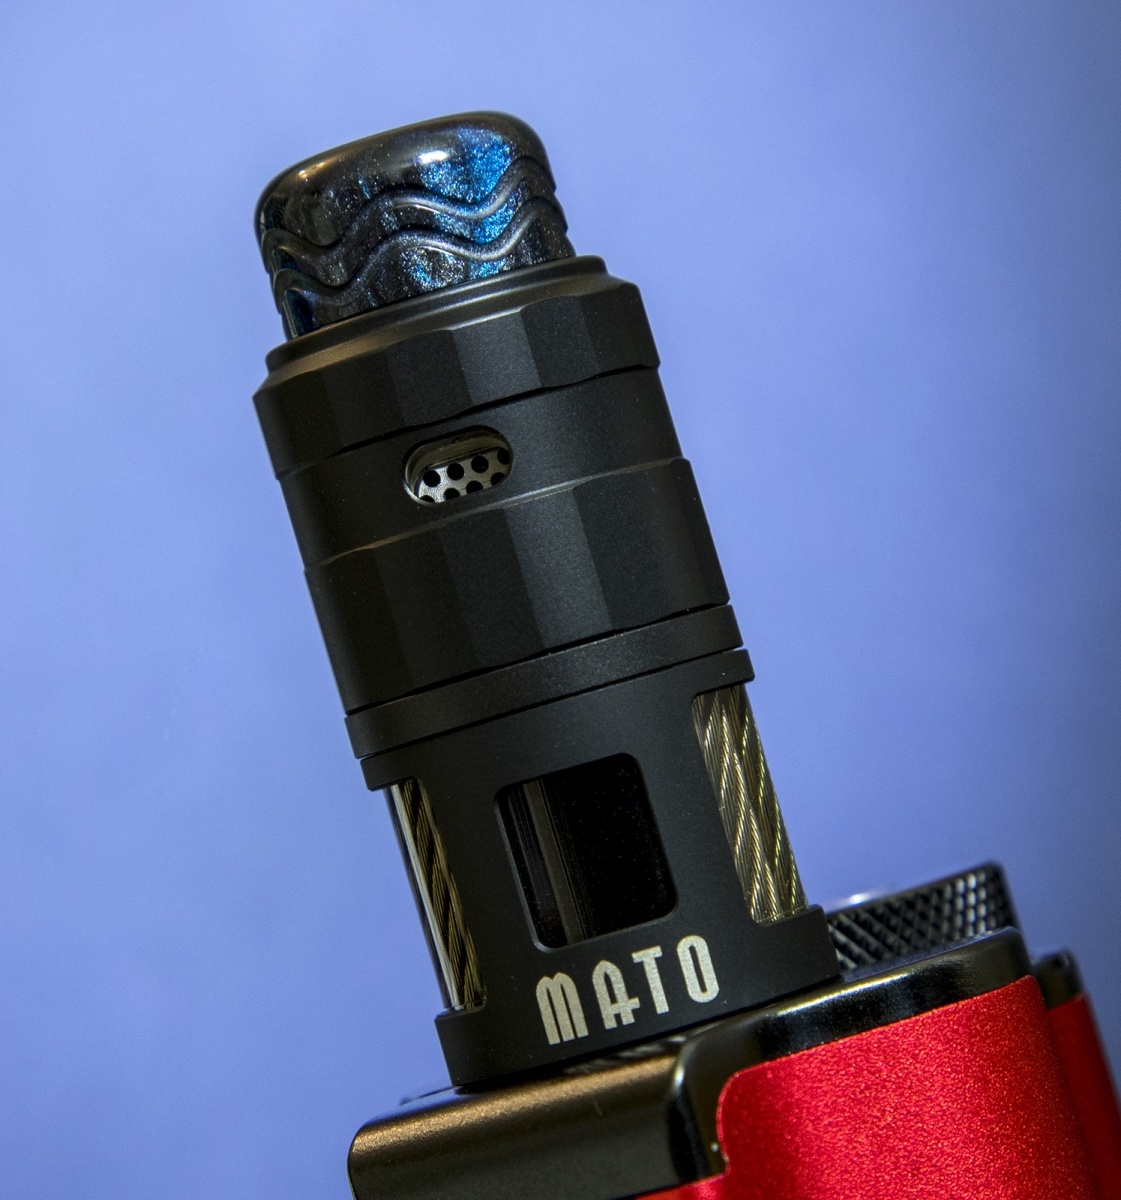
I should have noticed something wrong at this point but I was too distracted photographing it. There are five main parts in the construction (a couple more if you unscrew the 510 pin and positive post for a deep clean), and I was really impressed with the fit, nice clean threads and the top cap comes off with the perfect amount of resistance. The AFC (airflow control) adjustment is one of the best I’ve tried, it is so damn smooth with the right amount of resistance as you open or close it, it is also on two stops which are ideal. There is also a ‘push to fill’ port with a silicone bung which turned out to be mess free when filling the tank up.
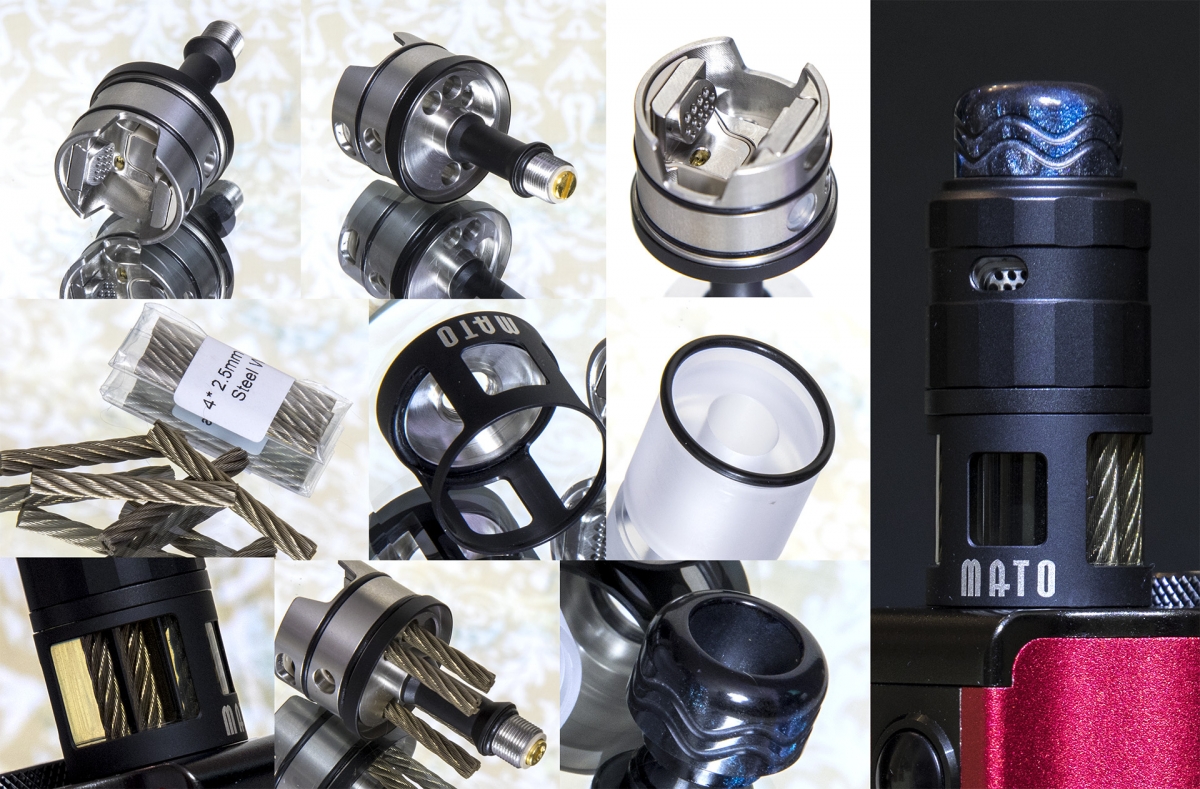
I took a few minutes out to inspect all the parts and extras. I tend not to read manuals as I like to see if it is common sense to put together. Indeed the MATO has no confusing parts, and all the threads are nicely machined.
The only minor confusing thing was the 510 pin. By default, it has a solid one so you need to unscrew it if you wish to squonk into the tank. I prefer this option as with a squonk bottle in addition to the tanks capacity, it is pretty much a full days vaping without refilling (around 15ml in my Topside). Back onto the pin, it is in two separate pieces which need to be unscrewed. The first part is tiny and I almost lost it, the squonk pin however is in one piece, I haven’t the foggiest idea why?
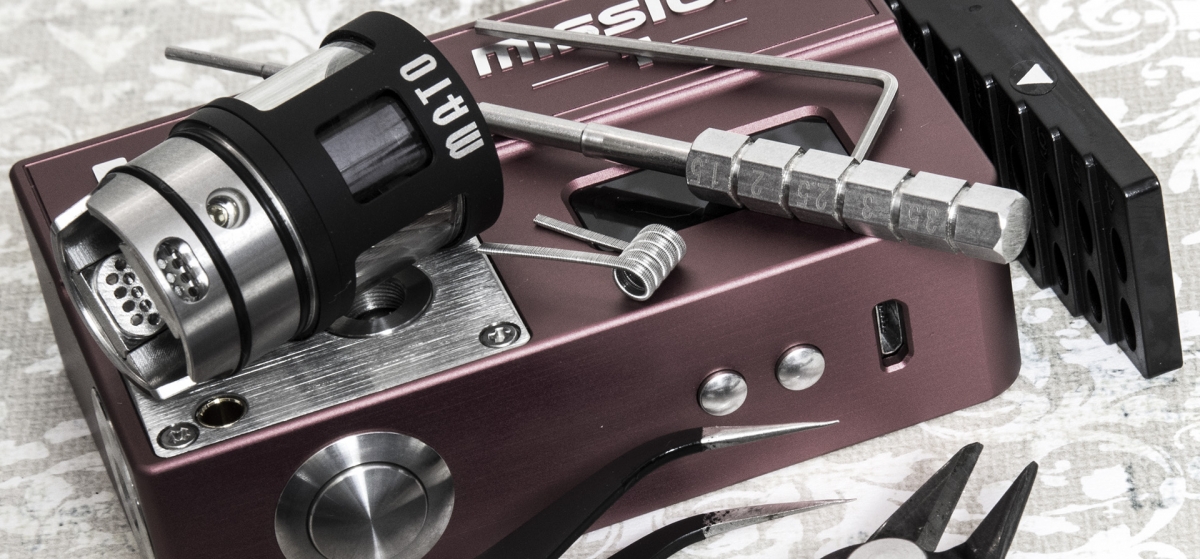
Onto the build items, Vandy Vape include a triple fused clapton (Ni80 0.23 ohms) 3.5 ID coil which is a great option, especially for a single coil atty. Now onto the first mention of the steel ropes which act as a juice feed up to the cotton in the coil, working by capillary action to supply a constant feed. For some reason, they supply two sizes; 2.5mm and 3.0mm diameter. The 2.5mm ones just seem way too loose. Also included is a coil trimming tool which is pre-marked with Vandy Vapes recommended 7mm coil leg length. The only thing missing was the cotton.
Building and first hurdle
So this is where I found the first major hurdle in the TPD 2ml version and something that is a total pain in the ass if you don’t know about it in advance. That is the tank tube which is capped at both ends so it will NOT allow you to fit the steel ropes, end of, no workaround included in the box and no warning that you cannot assemble the MATO as intended unless you purchase the additional 5ml PSU Tube so BEWARE and check if your chosen supplier will provide the tube or at least have one available to buy. Without it, you can only build it like a traditional RDTA and push your cotton wick through the holes which I wouldn’t recommend as it’s pointless for 2ml.
Thankfully New Vaping must have been aware of Vandy Vapes mess up and provided a 5ml PSU Tube along with the MATO, so credit to New Vaping for supplying one. I’m not sure if you have to purchase it separately though.
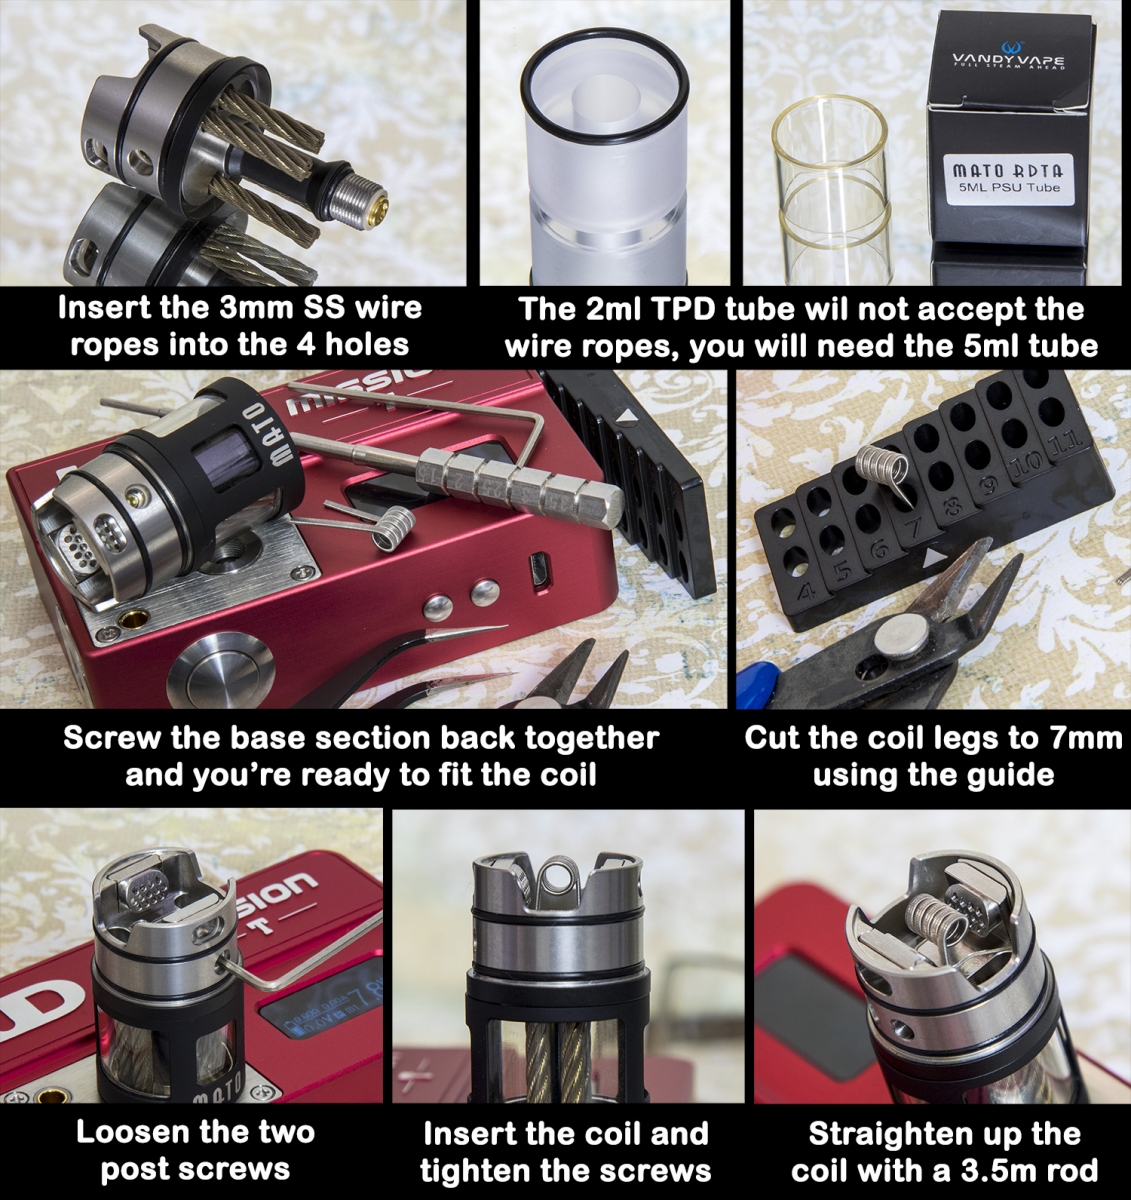
For my first build, I went along with Vandy Vapes 7mm leg length. It seemed a little high to me but I thought I would go along with it. Once trimmed, fitting the coil is a doddle. I really like the deck and post screws on the MATO, it is very roomy and easy to straighten up your coil afterwards. It is possibly the fastest first build I’ve done, even the recessed post screws aid in the ease of building.
Wicking, priming and filling
The more observant of you might notice my drongo error (photo 1 and 2), I forgot to dry burn the coil before wicking. With a contact coil (no gaps), it is best to pulse dry burn the coil around 30 watts and strum out any hotspots with some ceramic tweezers until it glows from the inside out. Try not to overburn it, a few pulses should be fine to get a gentle glow.
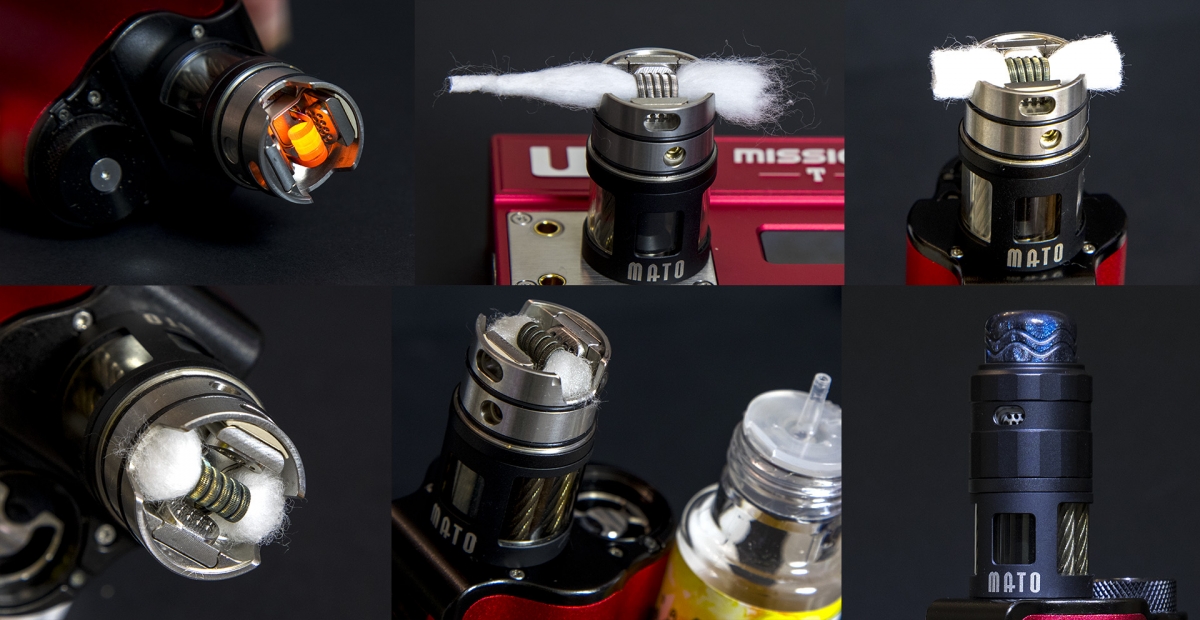
Wicking length was a bit of a guess. If in doubt, just do one end first as you can pull more through or less if required. It needs to be long enough to tuck into the juice ports and rest on top of the steel ropes. Do not stuff them in tightly, just enough to rest on top is ample. For a 3.5mm inner diameter coil, I didn’t need to thin the cotton out any, but with a larger coil you might need to.
It’s really intuitive to wick and the generous deck makes it simple to tuck the wick in. Fully saturate your coil by pulsing the coil while dripping eliquid directly onto the coil, no need to drip onto the legs as they will saturate on their own as you pulse drip. Once the legs are soaked, then you’re good to go.
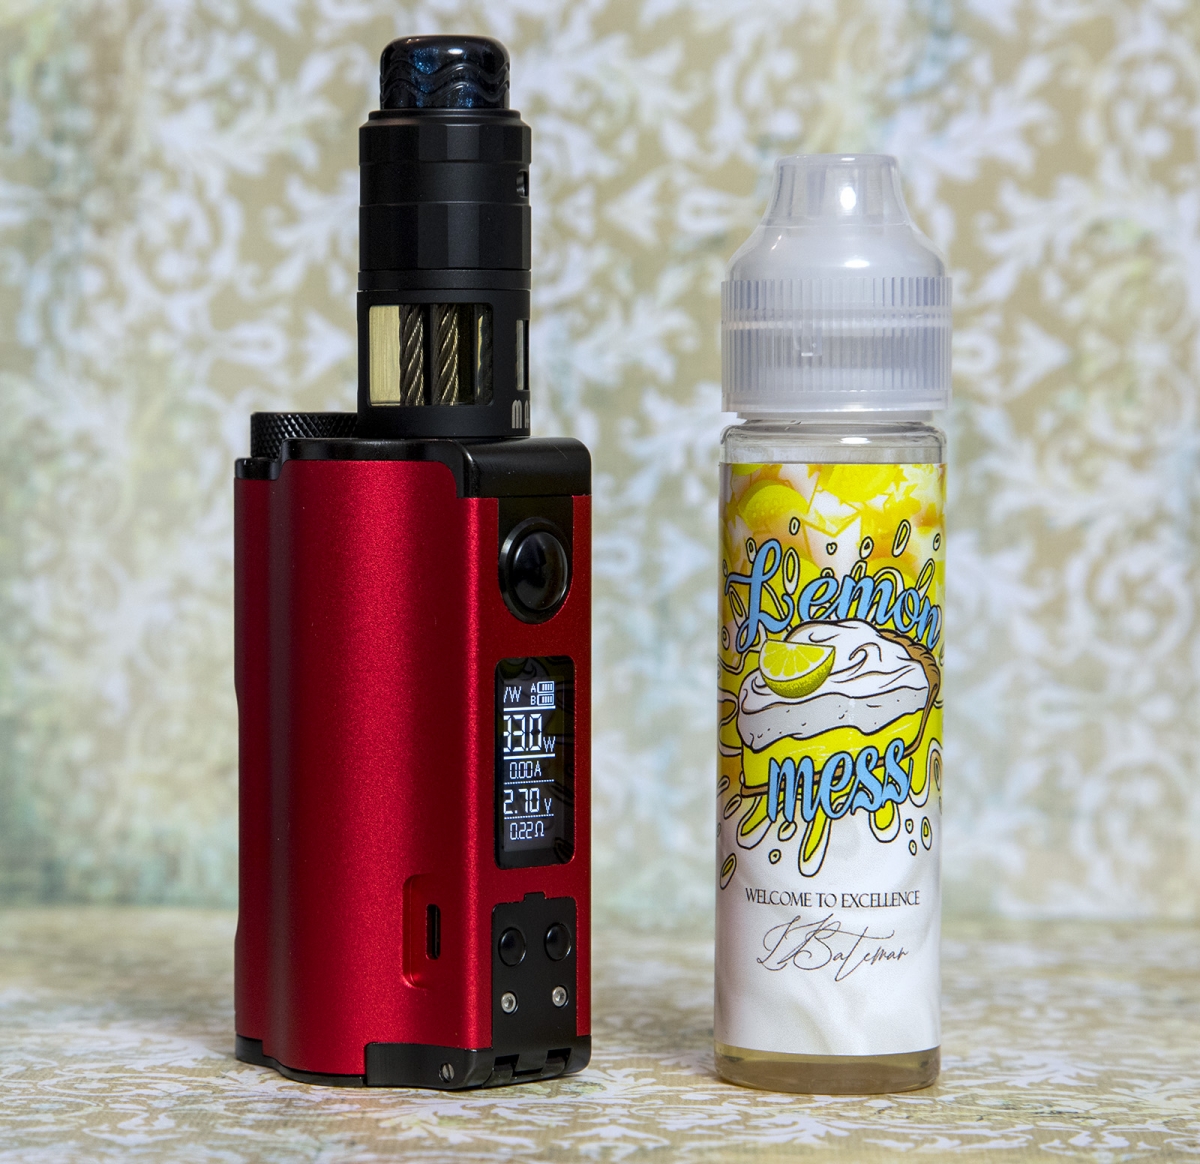
Before popping the top cap on you will need to fill up the tank. This is done via a juice port located close to one of the post screws. It has a silicone seal to prevent spillage. I found it really easy to fill using a regular shortfill bottle, but it might be a pain if you have a thick nozzle. If you intend to Squonk then you can fill it that way.
Slide on the top cap and it’s ready to vape.
Performance
Since I was already at 30 watts, I eased up from there and ended up around 55 watts with the airflow mostly open. The flavour was pretty good and gave a smooth draw. For a single coil atty, it’s quite impressive though in all honesty there was no ‘wow’ factor for me. The steel wire wicking kept up flawlessly and fed the coil even when chain vaping, but ramping up the wattage is where the MATO really comes to life. At 70 watts, for a single coil I was surprised how well it kept up wicking while chain vaping. I’ve kept an eye on the wick to see if there’s any signs of it burning from juice starvation, but it all looks like a fresh wick and lasting really well.
The coil is quite close to your mouth, in fact the coil is a lot closer to your mouth than most RDAs I can think of as the inside of the chamber has no chamfer or bevel due to it almost sitting on top the build deck. All the airflow is simply from around the coil and straight up through the 810 drip tip. I was experiencing a fair amount of spit-back at lower wattage (50 watts and under). Generally spit-back is from too much juice on the coil, but looking inside at the coil and wick, it doesn’t appear to be flooding. In fact the coil and wick look really good and just saturated enough. Too loose wicking can also contribute to coil flooding, but I’m more than confident my wick was tight enough. I am now second guessing Vandy Vapes recommended leg length of 7mm so I decided to tweak the build and trim the legs down to 5mm and re-wicked a little shorter for a lower coil.
For me, the lower coil was a much better vape, the spit-back was barely noticeable and it was delivering a better flavour. The difference 2mm can make made it worthwhile tinkering with it. With the coil that bit lower, you can now see the airflow vents hitting the bottom and top of the coil equally. Before, it was mostly coming from underneath. Happy with the vape now, but the cons were starting to show which are mostly from the bundled extras (coil tool marking, TPD tube and no cotton so far).
Putting my niggles to one side, I carried on using the MATO for a few days of regular use. The speed this thing wicks is impressive, and the other thing that impressed me was the condition of the coil and cotton after a few days, it all looked like a fresh build. I’m used to seeing this in TC (temperature control) builds, but for a variable wattage setup, the speed the juice gets to the coil is preventing unwanted cotton burning and burnt gunk.
I’m yet to try another coil in it, but the one that came included would probably been my choice anyway. I can’t see the benefit of an SS316L stainless coil for TC mode as there’s not much benefit if the MATO wicks this fast.
Conclusion
The MATO didn’t strike me as very innovative as the steel wire thing is on trend at the moment. However, Vandy Vape have done a great job implementing it with a great coil deck and airflow that makes this atty really work. That said, I’m expecting to hear people not so happy with it if they build as VV suggest. I’m fairly confident that a lower build with 5mm leg length improved my experience with this tank. Since I have a proper Coily tool, then the VV one will go back into its box and will never to be seen again.
I keep having to remind myself that the MATO is a single coil RDTA as it performs as good, if not better, than the dual coil RDTAs I have tried.
I really rate the actual RDTA but I’m not overly impressed with Vandy Vape’s finishing touches. The package wasn’t great, the TPD tube is plain wrong to include in this kit and it will likely catch out many unaware buyers that are stuck until they manage to source the 5ml tube.
For tits and giggles, I did look at the manual and that was as vague as a politician’s answer to a direct question. Fortunately the assembly is very intuitive and easy to build so I doubt many would resort to a manual.
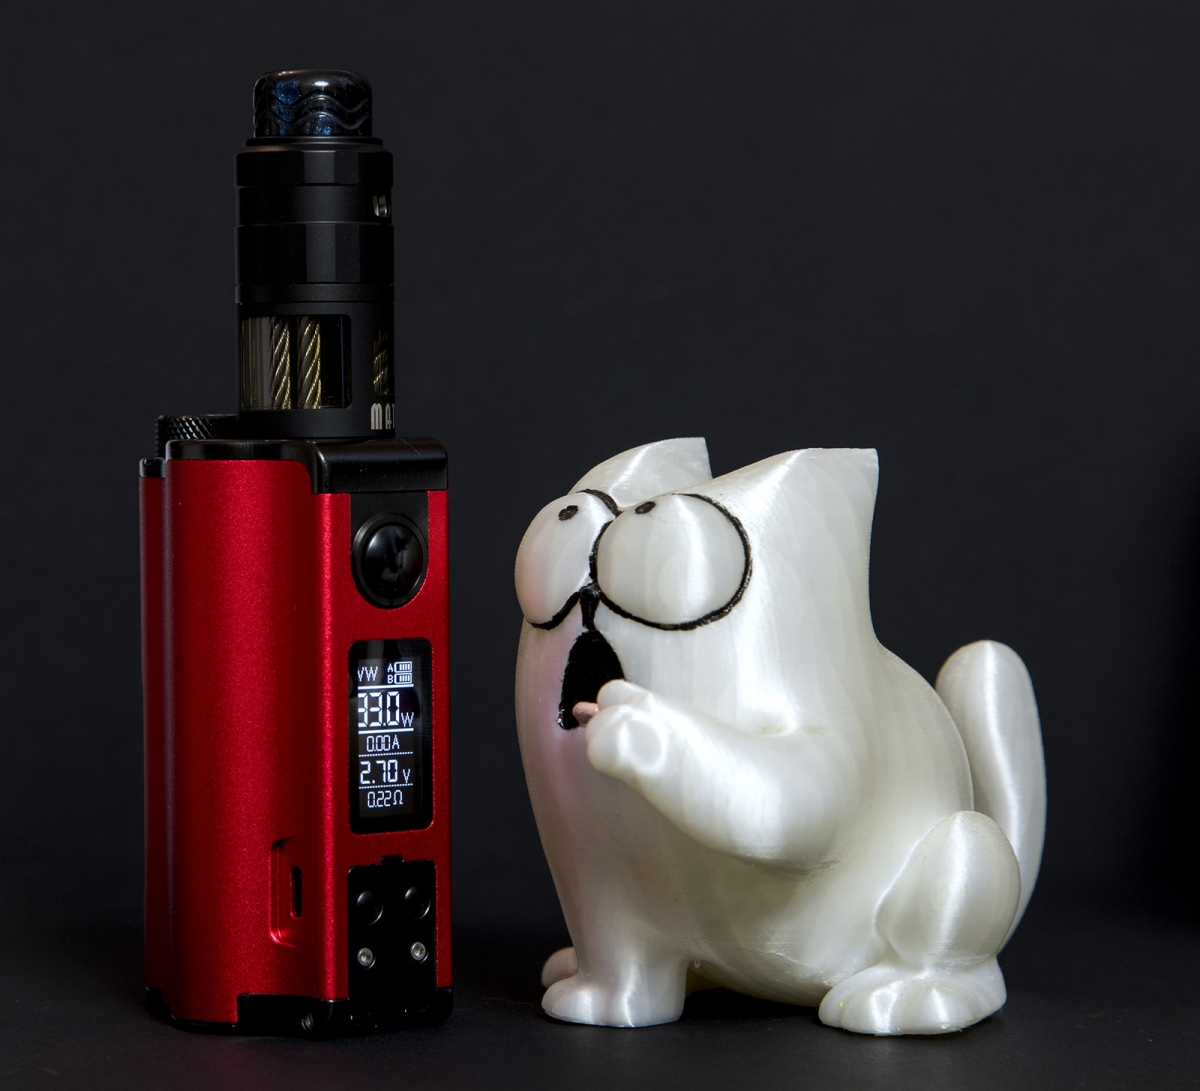
Simon’s Cat gives it a claws up
Pros
- Easy to build
- Great flavour and vapour production
- Airflow control is perfect
- Quality construction
- FAST wicking due to steel rope juice flow
- Superb coil and wick lifespan
- Easy filling
Cons
- TPD 2ml is infuriating and unusable (requires additional purchase)
- Coil tool is wrong in my opinion
- Tight arse extras (no spare glass, no cotton or extra 3mm steel ropes)
- Token gesture manual
Final thoughts and score
Pretty much all of the cons are soon forgotten once you’ve found a build to suit you so you’re left with an RDTA that performs really well. For a single coil atty, it performs close to or better than some dual coil RDTAs. The whole steel rope gimmick is worthwhile for that dripper like experience without having to drip.
Score: 7.5/10
A superbly developed RDTA that lacks a little afterthought with TPD unfairness.
Thank you to New Vaping for providing the MATO to review and also for providing the much needed 5ml Tube.
https://www.newvaping.com/products/vandy-vape-mato-rdta
Si Davies
Reviewer at POTVMy background is Engineering and Professional Photography. Mostly from POTV users knowledge I learned so much about pretty much all styles of vaping and equipment, Cloud Chasing, Squonking, Mouth To Lung, Direct To Lung, Pods, Mechs, Rebuild-able tanks and atomisers etc, and have experience with many many devices and atomisers, it's become a hobby and enjoy trying out the latest gear. I like to think my reviews are plain speaking and informative without getting too technical, if I have to resort to reading the manual then I don't consider it user friendly!
Join the discussion


Thunderhead Creations Tauren Boro Tank
Decent vaping doesn't have to cost the earth as Thunderhead Creations prove with the new Tauren Boro tank
-
by Antony Lord

Hellvape Dead Rabbit Solo RTA
Looking for a new single coil RTA? Hellvape might have just the thing with their new Hellvape Dead Rabbit Solo RTA
-
by Antony Lord

Cthulhu 850 RBA and Kraken Tank
Cthulhu have already released a fantastic little Boro mod with their tiny AIO, and we got to play with their 850 RBA kit to go with it (or any other Boro device you might be using!)
Vapefly Alberich 2 RTA
Antony has been a fan of Vapefly products for a while, so he was delighted to get the chance to check out the new Vapefly Alberich II mtl RTA
-
by Antony Lord