OXVA arbiter solo RTA
Have OXVA pulled off the impossible by bringing out an RTA that works for both Mouth to Lung and Direct Lung vaping? Antony takes an in-depth look at the OXVA Arbiter Solo RTA to find out
-
by Antony Lord

Share on:

OXVA got in touch recently and asked if we’d be interested in taking a look at their upcoming Arbiter Solo RTA. Little info was given other than it was a single coil RTA. Having been impressed by the previous OXVA kits I’d taken a look at and being something of a sucker for single coil RTAs, I thought this was worth a punt so I promptly threw my name in the hat. I was expecting a single coil variant of OXVA’s previous Arbiter dual coil rta, but as details began to emerge, it became apparent that this was going to be something different from anything we’d seen before with pictures teased of an intriguing ring on the top near the drip tip showing a MTL—>RDL adjustment. What did OXVA have up their sleeve?
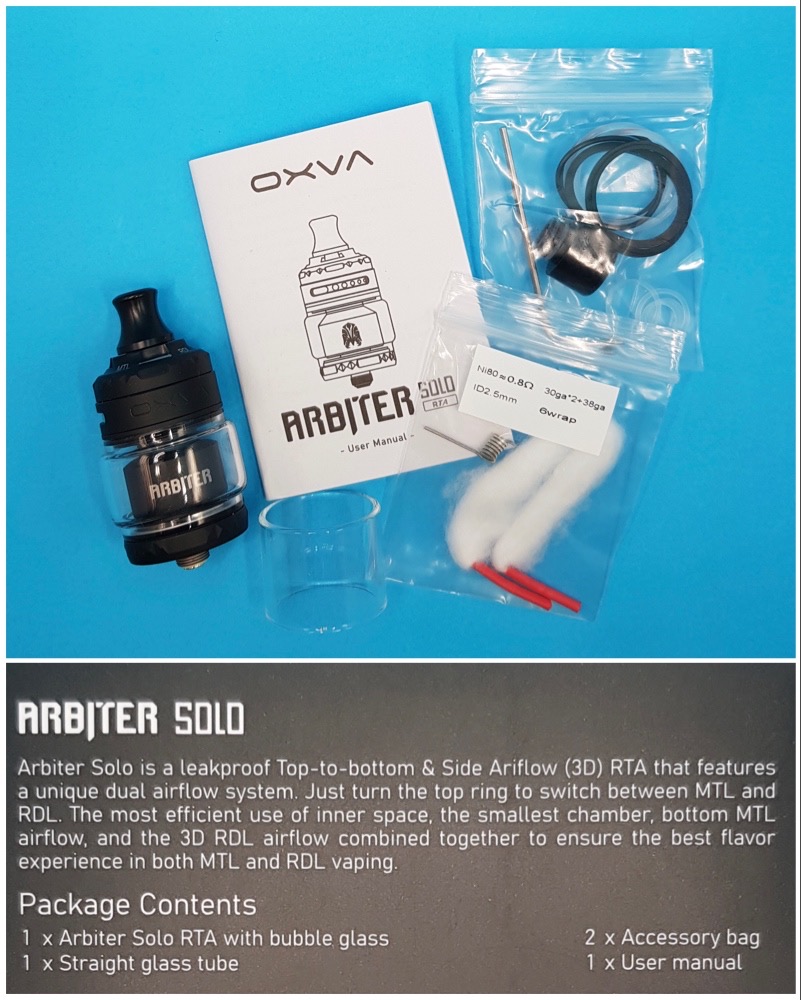
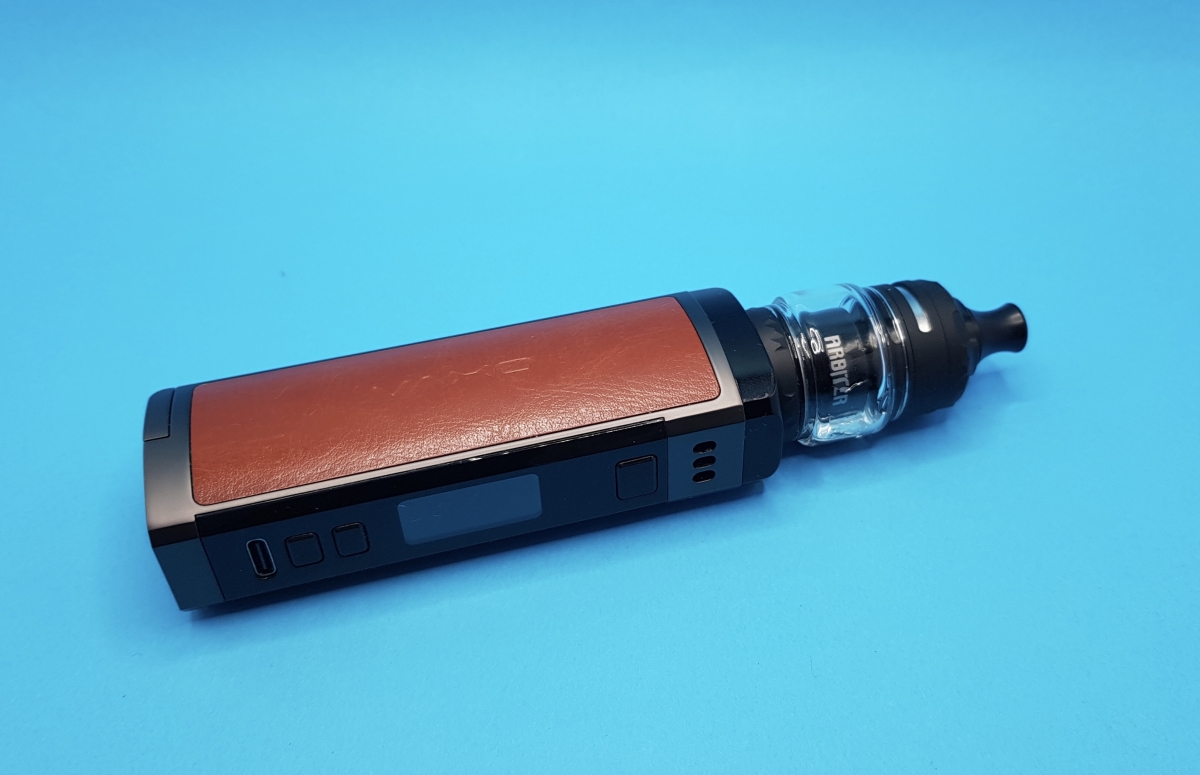
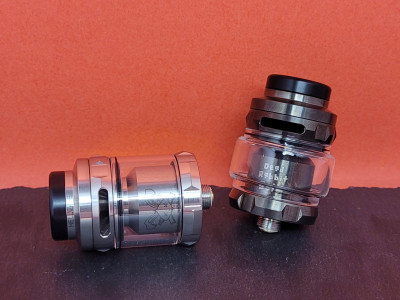
In the box you have the Arbiter Solo RTA. I was supplied with the international version for the review which comes with a 4ml bubble glass installed and a straight 2ml glass, but for the TPD release you’ll just get two 2ml straight glass tubes. There’s also a small instruction leaflet, a bag of spare o-rings and a premade Ni80 coil with some cotton. You even get two drip tips included in the package, a MTL one with a 3.5mm inner bore, and a straight direct lung (DL) one with a 5.8mm inner bore.
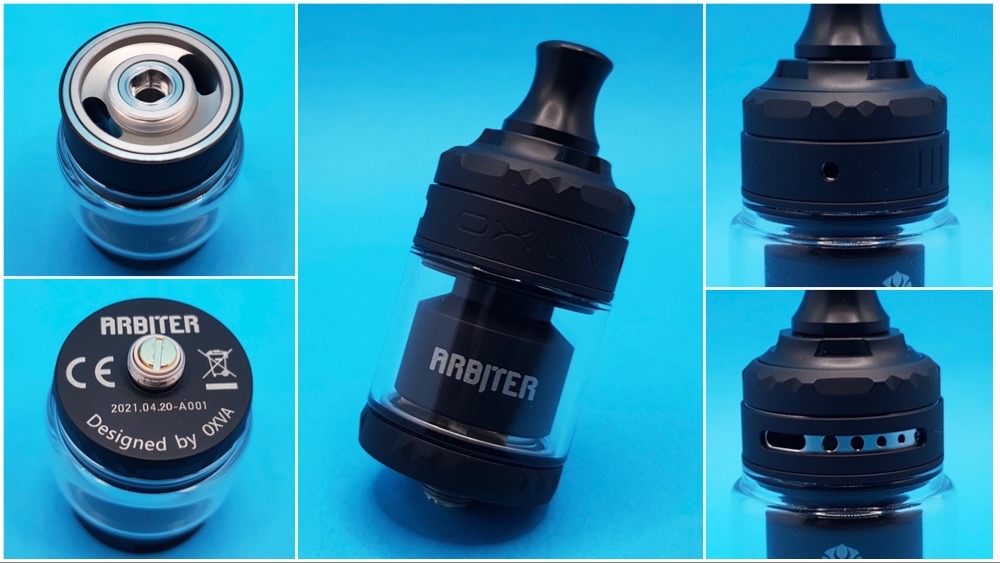
This is actually quite chunky for a mouth to lung (MTL) tank, it’s 24mm at the base but bulges out to 28mm with the bubble glass or 25mm with the straight glass. Height wise, it’s 39.9mm excluding the 510 and drip tip.
There’s a protruding 510 pin on the base with good insulation, so I would consider this to be a mech safe design if that’s your thing. Once you remove the top cap (more on that later), there are two generously sized fill holes so filling is easy, and just below this is the adjustable airflow ring which means this should be leak resistant as it’s a top down airflow.
The airflow ring has multiple air holes (0.8,1.0, 1.2, 1.5, 1.8mm and a DL slot which is approximately 5.9x2.0 mm). There are two options here, turn it all the way to the left to use the direct lung airflow, or turn it to the right to bring the 1.8mm single MTL airflow into play.
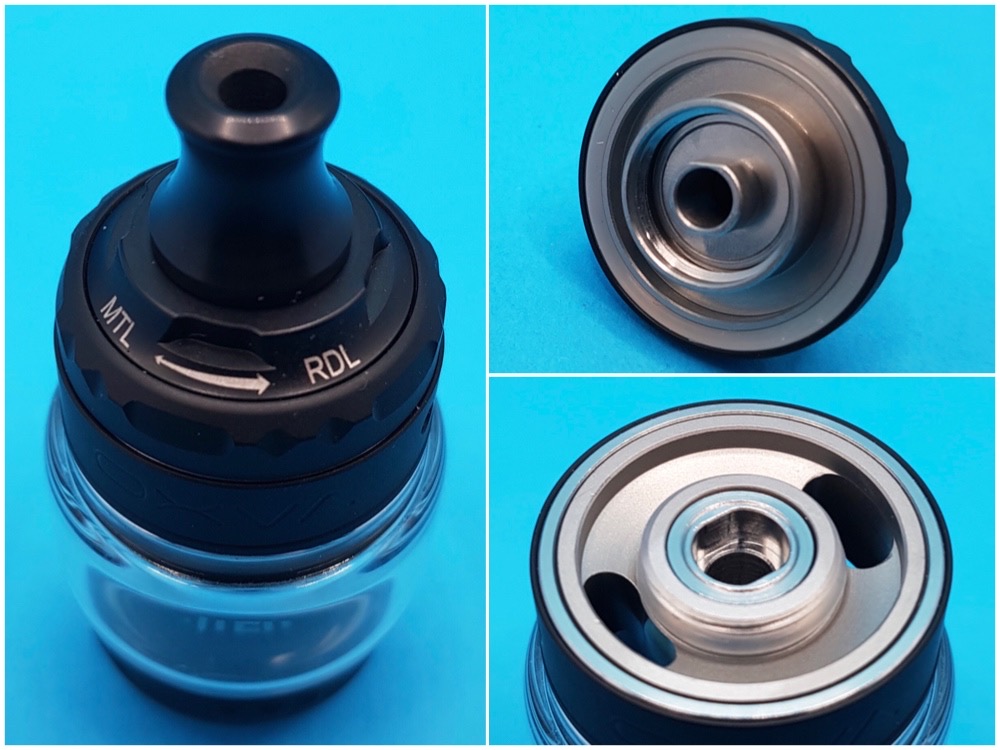
On top is that interesting MTL—> RDL adjustment, this turns the inner chamber and is keyed into the chimney with two flat sections. This does wobble a little but not so much that you notice it in use, and it has enough tension to ensure that it doesn’t accidentally get moved without making things so tight that it’s difficult to adjust.
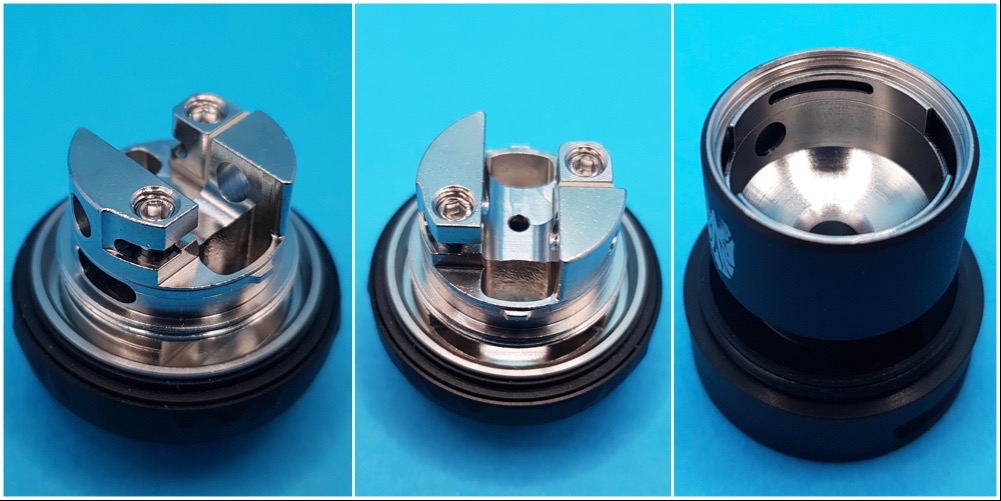
This leads us down to the build deck and inner chamber where all the magic happens. The deck bears more than a little resemblance to a small RDA with dual 3.0mm side airflow, and a 1.5mm under coil airflow which is fed from the large slot near the base.
The trickery happens inside the slightly domed bell cap; those two large slots at 3 and 9 lock onto the lugs on the outside of the wick ports to ensure that everything lines up properly and restricts the movement of the chamber to the two positions. The thin slot lines up with the lower under coil MTL airflow. There’s another slot on the other side of the chamber so it doesn’t matter which way round you put the cap on, this airflow will always be open. Above these are the two holes which line up with the DL airflow. In the MTL position, these will get blocked off as they then line up with the outside edge of the posts effectively closing this airflow off.
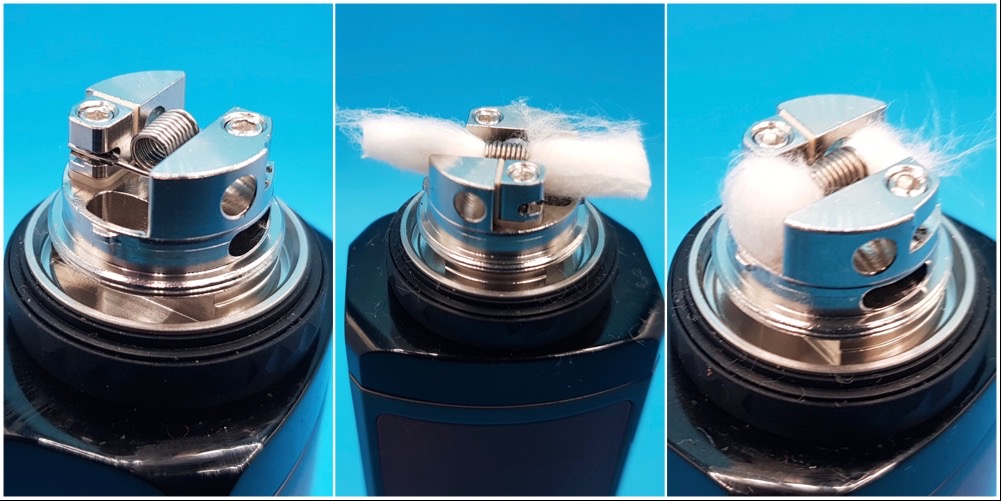
As I wasn’t going to use the included nichrome(Ni80) coil because of my nickel sensitivity, I went straight in for the kill with my default 0.8ohm MTL kanthal round wire build. Capturing the legs was a doddle, no faffing about with legs getting spat out from under the grub screws here, and cutting the legs was also easy as the area around here has been milled out slightly to allow easy access and ensure that you shouldn’t have issues with grounding out against the bell cap. For wicking, I simply cut the wick in line with the outer edge of the atomizer, thinned out the wicks a little and tucked them into the generously sized wicking ports.
All juiced up and ready to go, I set the top airflow adjuster to MTL and selected the largest single airflow hole on the airflow control ring. I went straight to my default 20 watts for this build, WOW! This was spectacular right out of the gate, absolutely tons of dense flavour and a satisfying MTL crackle from the coil. This gave me a really nice, slightly loose, MTL vape, and you can of course tighten the airflow ring down even further if you wish and this still performs well, but this was spot on for the way I like to vape.
So how does the same build fare with a direct lung hit? A quick change of e-liquid (I didn’t fancy direct lunging 18mg nicotine!) and a flip of the airflow control over to the RDL setting, and a little bit of experimentation gave me a good reduced lung hit at 30 watts with the airflow fully open, and the wicking was still keeping up. There’s just a hint of restriction and the flavour is good but not outstanding, but I suspect that’s down to the simple build as I’m more used to fused claptons in this sort of application.
One eagle eyed forum member noticed that the posts are “the wrong way around” for most pre-wrapped coils and wanted to know how easy it was to install a coil “belly down” and pull the coil up?
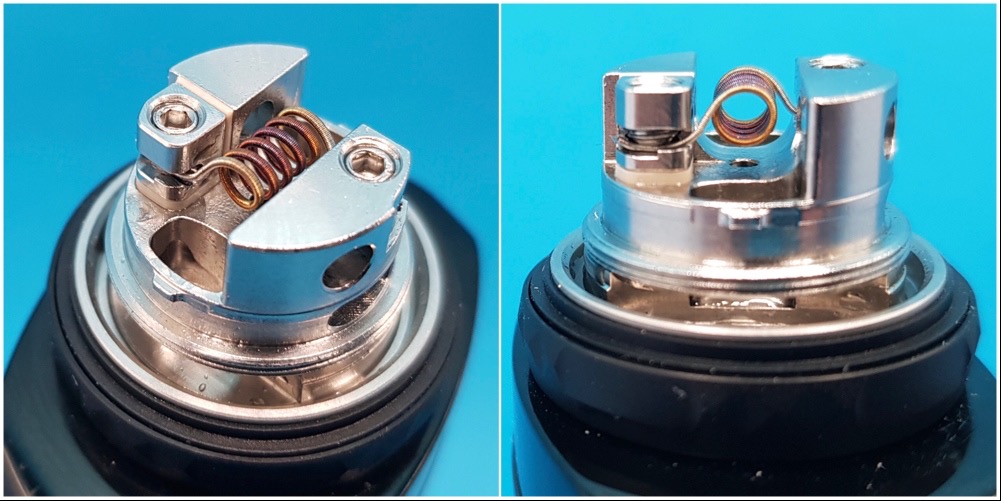
Answer is pretty easy, in fact the supplied Ni80 coil is wrapped this way. I found that this was more easily achieved if you put a 90 degree bend in the legs (again the same as the supplied coil) and left a little slack in the legs so that you can lift the coil up slightly to properly align it with the side (RDL) airflow.
This build came out to 0.52ohms (ss316L fused clapton) and this really made the RDL experience come alive at 35 watts with much sharper high notes on the fruity e-liquid I was using. Once again the wicking kept up with no issues, and I was much happier with this for the RDL experience. Switching back to a MTL vape and this still gave a superb vape, but it obviously required a little more power than before.
It’s all positives so far but did I encounter any issues along the way? I have found that if you want to access the build deck that the top cap also tends to come undone at the same time and the top o-ring doesn’t hold the glass on all that securely either, so I’d definitely recommend that you make sure the tank is virtually empty before attempting this. The deck can be removed with the top cap and glass in place but I found that nine times out of ten, either the top cap would come undone or the glass would fall off so it’s simply not worth the hassle.
Pros
- Superb MTL and RDL experience with the right build
- Innovative airflow
Cons
- Glass not held on securely
- Top cap tends to come undone when unscrewing the deck
Conclusion
This wasn’t what I was expecting at all, I was anticipating a “cloud chuck” single coil RTA, but this is so much better! OXVA have pulled off the seemingly impossible task of designing a tank that can pull off a good MTL and DL vape at the same time where many previous attempts to do this have often resulted in disaster on both fronts. Aside from a few minor niggles, accessing the deck with a full tank of e-liquid, this has been a pleasure to use and if you want a truly flexible RTA, then this should be high on your purchase list.
Many thanks to OXVA for sending the Arbiter Solo RTA over for review.
Antony Lord
Reviewer at POTVI was a twenty a day smoker for 25 years and like most smokers I was always going to quit "next week". Having hit my mid forties and having the usual smokers cough and difficulty with anything more than moderate exercise it was obviously time to give up the cancer sticks. I bought my first e-cigarette in 2013 when they were expensive, difficult to find and quite frankly... crap. I used it for about a week then went back to the roll ups, mark up another failed quit attempt. The fact that I had just changed jobs and was under quite a lot of stress probably didn't help. Move on to 2016 and whilst I was browsing eBay I noticed that one of the suggested items that would occasionally pop up was for a cheap e-cigarette. It looked similar to the one I'd bought 3 years earlier but it was only £5 (about 8 times cheaper than before) so I decided to give it another go on a whim. Once the kit arrived I managed to gradually replace the cigarettes with my new kit over a two month period and got into watching YouTube reviews for newer kit. My cheap and cheerful kit was replaced by a more upmarket affair, and being a noob I made a mistake once it arrived... I put in the supplied direct lung coil, this was of course a complete revelation and I haven't touched a cigarette since. Oh and I no longer spend the first five minutes of every day having a coughing fit either.
Join the discussion


Thunderhead Creations Tauren Boro Tank
Decent vaping doesn't have to cost the earth as Thunderhead Creations prove with the new Tauren Boro tank
-
by Antony Lord
Hellvape Dead Rabbit Solo RTA
Looking for a new single coil RTA? Hellvape might have just the thing with their new Hellvape Dead Rabbit Solo RTA
-
by Antony Lord

Cthulhu 850 RBA and Kraken Tank
Cthulhu have already released a fantastic little Boro mod with their tiny AIO, and we got to play with their 850 RBA kit to go with it (or any other Boro device you might be using!)
Vapefly Alberich 2 RTA
Antony has been a fan of Vapefly products for a while, so he was delighted to get the chance to check out the new Vapefly Alberich II mtl RTA
-
by Antony Lord