Aspire Kumo RDTA
Aspire have really been spoiling us lately and this trend continues with their latest collaboration with Steampipes, the Kumo RDTA
-
by Antony Lord

Share on:
UK Aspire Vendor (UAV) asked if we’d like to look at the latest entry from their Prestige lineup where they collaborate with well known “high end” vape companies and bring their designs into mass market territory. This time they’ve partnered up with Steampipes to bring us a direct lung RDTA featuring their rather unique patented Capillary System E-liquid Conduction Technology, so I was surprised when there wasn’t a stampede from my fellow reviewers when the Kumo RDTA was offered up for review. More fun for me then, I do like a challenge every now and then!
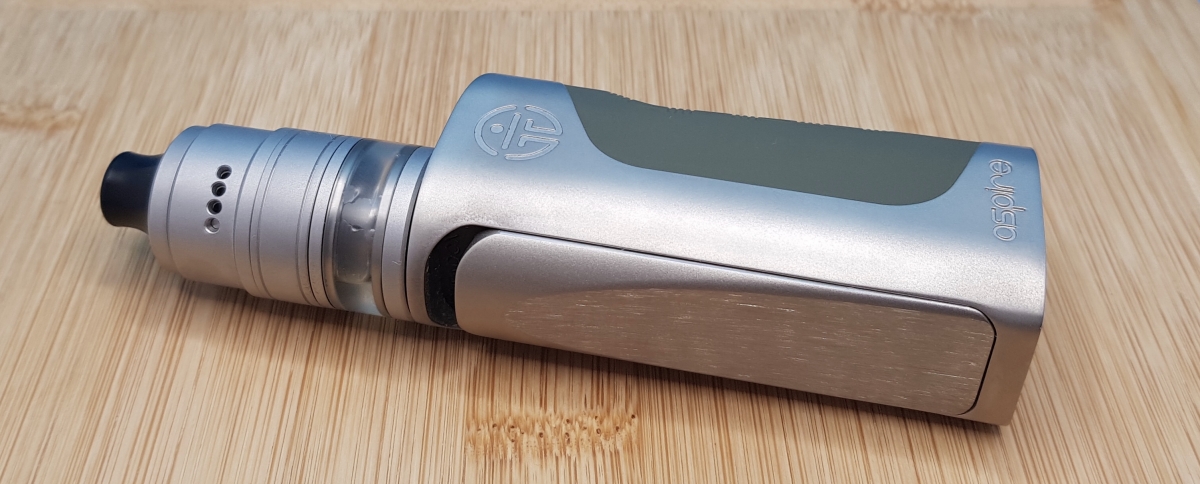
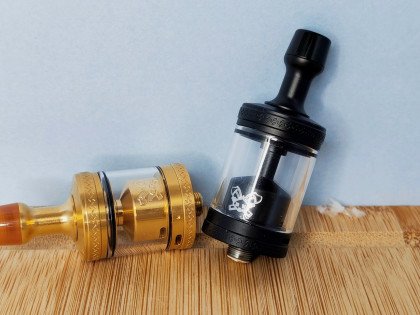
The Kumo RDTA came in sample packaging but apart from the word “sample” being printed on the front of the box, I believe this is more or less how final retail units will ship out. As is common with items from the Aspire Prestige range, the presentation is always top notch and you get plenty of extras included in the package. This time around you’re treated to two 810 compatible drip tips plus a 510 drip tip adapter, two airflow rings which also allow you to alter the appearance of the Kumo RDTA, an alternate metal tank section, and two Allen keys along with the usual spare o-rings and the like. The review sample came in a sandblasted “satin” finish but it’s also available in stainless steel and black satin finishes.
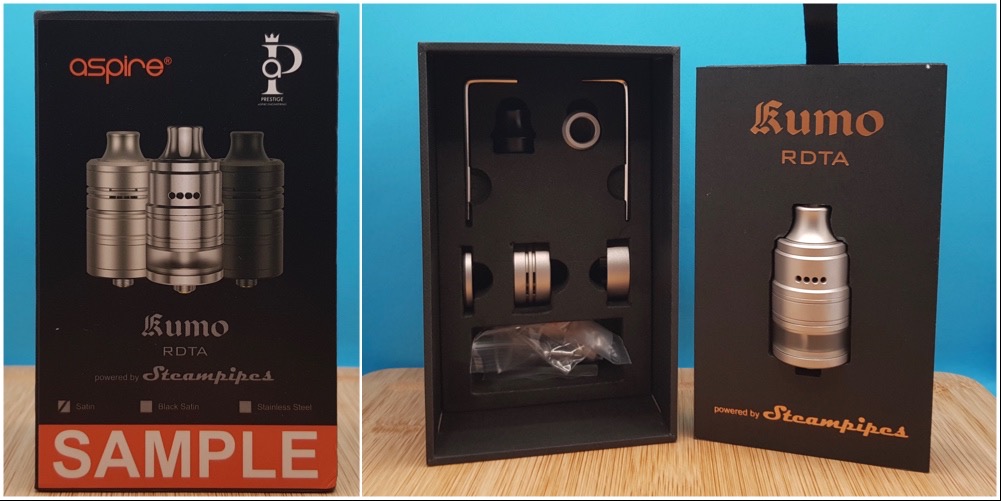
Specifications
- 24 x 37mm (excluding drip tip and 510)
- 67.6g
- Stainless steel construction
- Easy to build single coil direct lung RDTA
- 2ml capacity (TPD), 3.5ml (international)
- Unique Capillary System E-liquid Conduction Technology
- Side fill port
- Two styles in one with the replaceable AFC rings
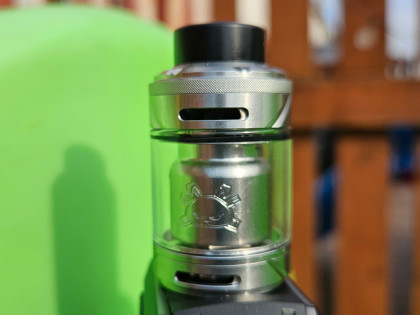
Straight out of the box, the Aspire Kumo RDTA comes with a stepped appearance with four visible airflow holes on one side and a metal drip tip in the same finish as the rest of the tank, but you can easily alter the appearance by using the alternate semi-concealed airflow ring. Unscrew the AFC locking ring on the top and swap the airflow ring over, taking note that this is keyed to only fit in one direction because of the notches in the top which restrict the movement of the AFC to the fully open and fully closed positions, then screw the AFC locking ring into place. A second larger locking ring is also included in the box for this to give the tank a cleaner, straight up and down look when using the alternate airflow. As I detest metal drip tips (no matter how nice they look), I also opted to swap that for the included POM drip tip which has the same design.
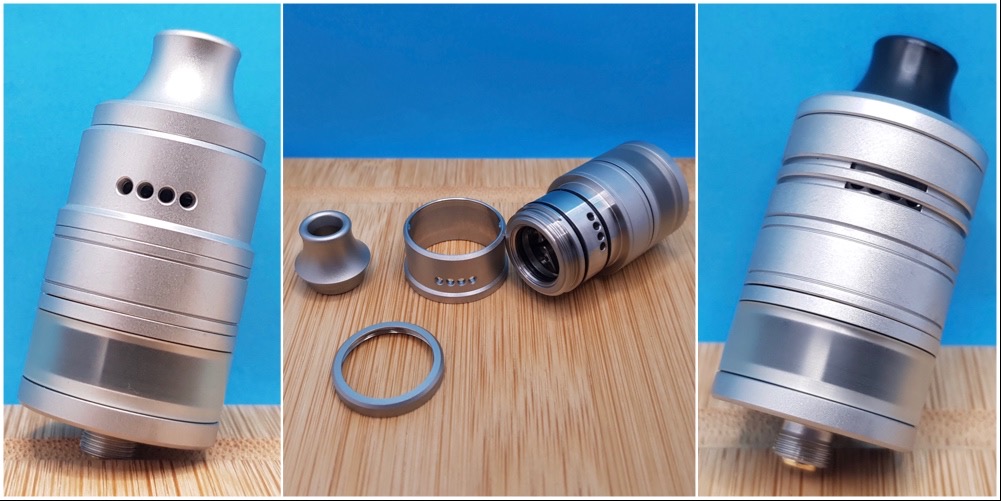
The AFC sections are held in place on the main barrel with two o-rings and the top locking ring, and they have a nice resistance to them. The threads on the AFC locking ring are also nice and smooth. I much prefer the cleaner look with the semi-concealed airflow but I did try them both with a build in place and there’s very little difference between them in use with perhaps just the slightest hint of more restriction on the semi-concealed AFC.
The top cap is easily removed from the rest of the tank and is held in place by another two o-rings, this exposes the fairly large two post dripper style build deck and the concealed fill hole on the side of the tank.
One area where the Kumo RDTA diverges from Steampipes Cabeo tank that it takes inspiration from is that the airflow is now only hitting your coil from one side rather than coming in from the top to be redirected to both sides of the coil. This vastly simplifies things and was possibly one of the compromises needed to bring this to a mass market product, on the plus side this means that the build posts now look far more robust. The airflow is set in slightly from the inner barrel to bring the airflow closer to your coil and you’ll need to bear that in mind when positioning your coil.
When placing the top cap back on to the tank there are a couple of notches milled into the side of the deck which align with the lugs in the top cap, this ensures that you can only place the cap back in the correct orientation. I did find that I had to wiggle the top cap around to locate these especially when using the semi-concealed AFC and this usually meant I ended up moving the AFC as well so I’ve gotten into the habit of adjusting it back to my preferred setting every time I need to fill the tank.
I have found that the top cap tends to sit up slightly on the o-rings leaving a small visible gap between the tank and the top cap/AFC. I wish that there was a small “twist to lock” mechanism in play here to prevent that, but that’s not possible because of the way the airflow is designed and this is hopefully something that will settle down as the o-rings bed in. It’s not totally obnoxious and the top cap is in no danger of coming off unexpectedly as it’s still held fairly well in place.
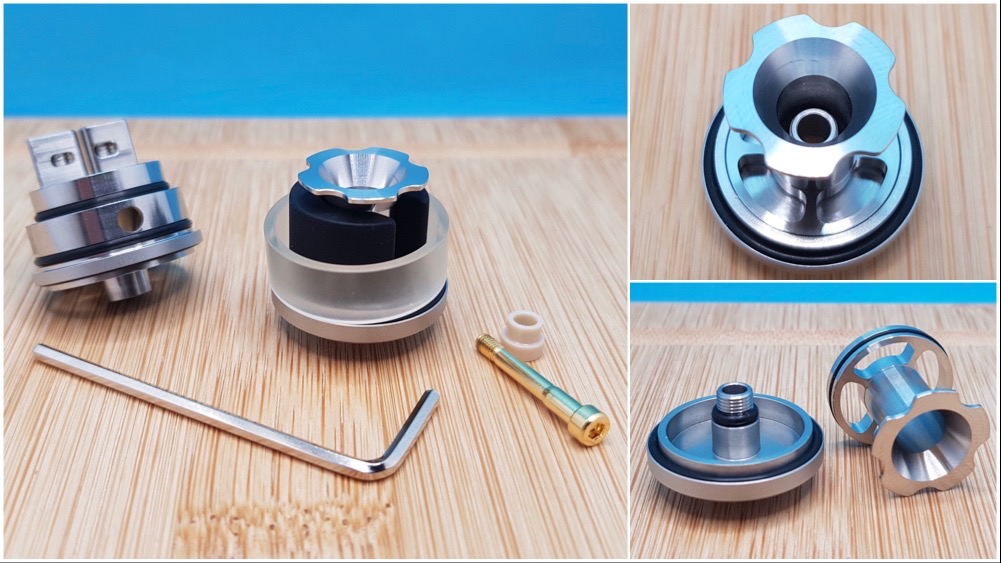
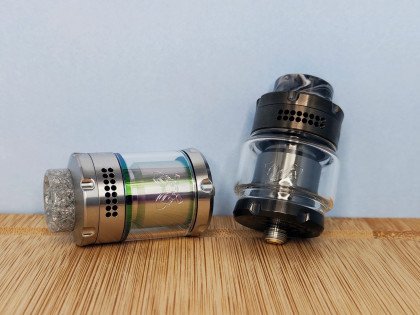
Next up (or down as the case may be) is the tank tube section. The preinstalled tank tube is plastic but there’s no mention of the material that I can find (PCTG, Polycarbonate?) so if you regularly use tank crackers you may want to exercise caution or swap it out for the metal tank tube section included in the box. To access this, you need to loosen the 510 pin using the larger of the two included allen keys, you can then unscrew the tank section, take care here not to lose the 510 insulator as there isn’t a spare.
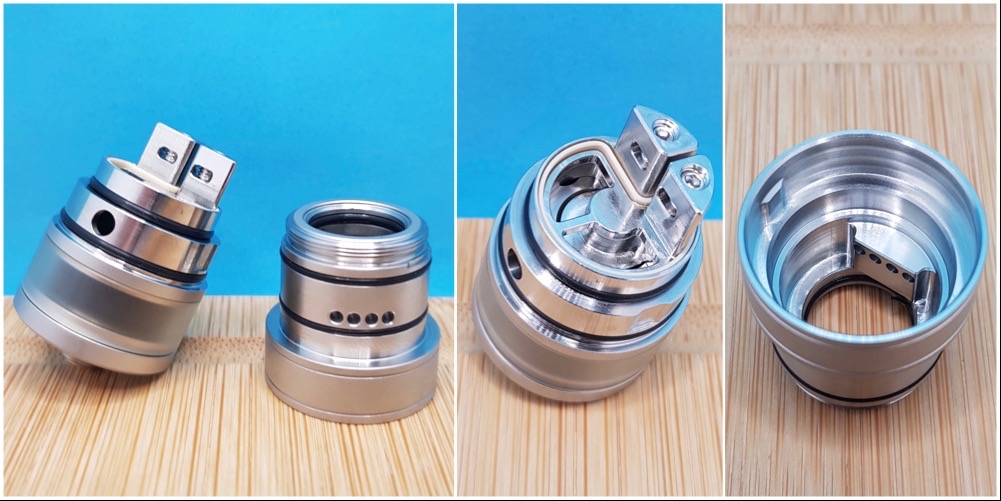
I was quite surprised to find at this point that there was a silicone bung in place to reduce the capacity to a TPD compliant 2ml. We asked UK Aspire Vendor if there would be any difference in the retail units and they told us that the sample version is 99.9% the same as the final release units, the Neeko and the Boxx also received the same treatment and gained ECID numbers, so the final retail units should also be the same. The bung can easily be removed for “cleaning purposes” as well.
From here you can see the way the Capillary System E-liquid Conduction Technology works. The capillary chamber stem can be removed from the base for cleaning and is held in place by an o-ring, liquid is pulled up from the base into the space between the stem and the central 510 pole to be delivered up to the “petal” at the top which forms the base of the build deck and this is where your wicks sit. This works by the clever application of Pascal’s law, as you inhale the difference in pressure between the vapour chamber and the outside air acts as a pump and simultaneously draws liquid up the stem to your wicks which means your cotton should remain constantly saturated.
OK, stripdown completed, it’s time to test a couple of builds here to see how well this performs in practice.
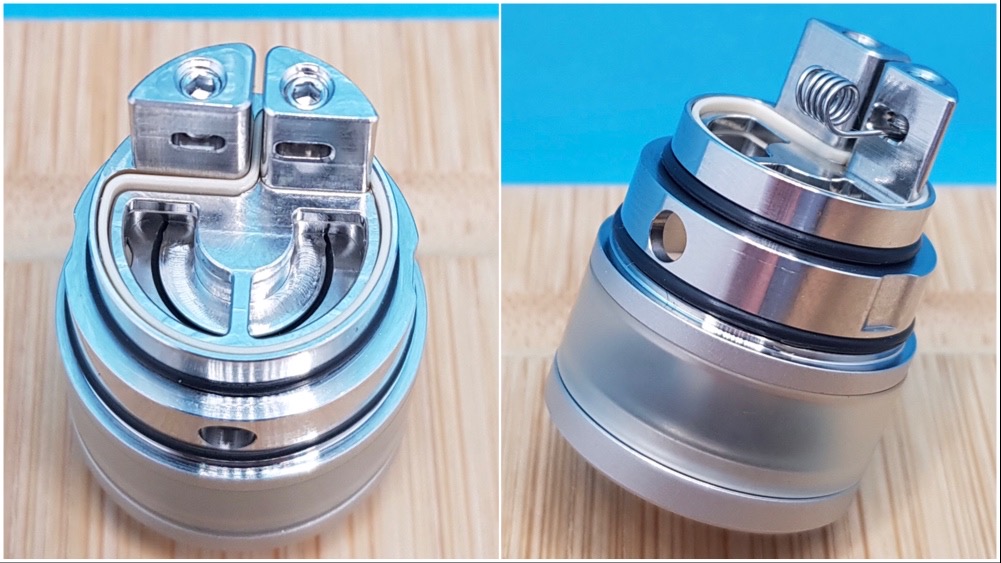
First up is the customary round wire kanthal build. Installation was easy with no difficulty capturing the leads, you want the coil to be positioned above the solid semi circle on the deck as shown, remembering that the airflow is stepped in from the top section. You can also clearly see the top of the “petal” from here and this is where your wicks need to lie.
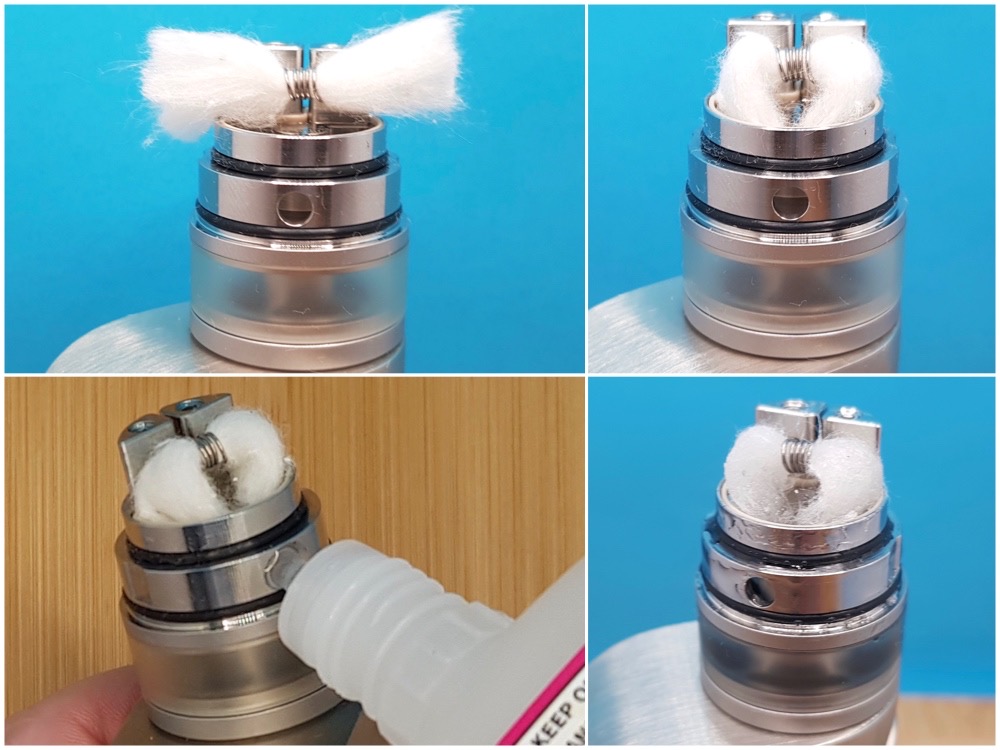
I cut the wicks a few millimeters past the deck. The wick ports are quite substantial and rather than thinning out the wicks, I merely fluffed them up before placing them down on top of the “petal” rather like wicking a dripper. As an experiment, I left the wicks completely dry and filled the tank until I could see liquid starting to bubble up at the bottom of the wicks, I then put the top cap in place and took a few primer puffs without pressing the fire button… after just a few puffs I could see that the wick was now fully saturated, now that’s physics at work!
I decided to see if this would leak if I held the tank upside down and I’m afraid to report I had my own blond episode here, I completely forgot that with the top cap off, the fill port is exposed so e-liquid went everywhere! Further experience has also taught me that it’s best to fill this with the tank in the almost upright position as well.
Confident now that the Capillary System E-liquid Conduction Technology did in fact work as advertised, I proceeded to find out how well it kept up. The build came out to 0.58ohms and I found this performed best at 40 watts with three airflow holes open. I got really crisp clean flavour and the wicking appeared to be keeping up well. Next I took ten chain hits and the wicking still kept up, I was starting to feel a bit giddy by this point though even with 3mg nicotine, so I concluded that this works!
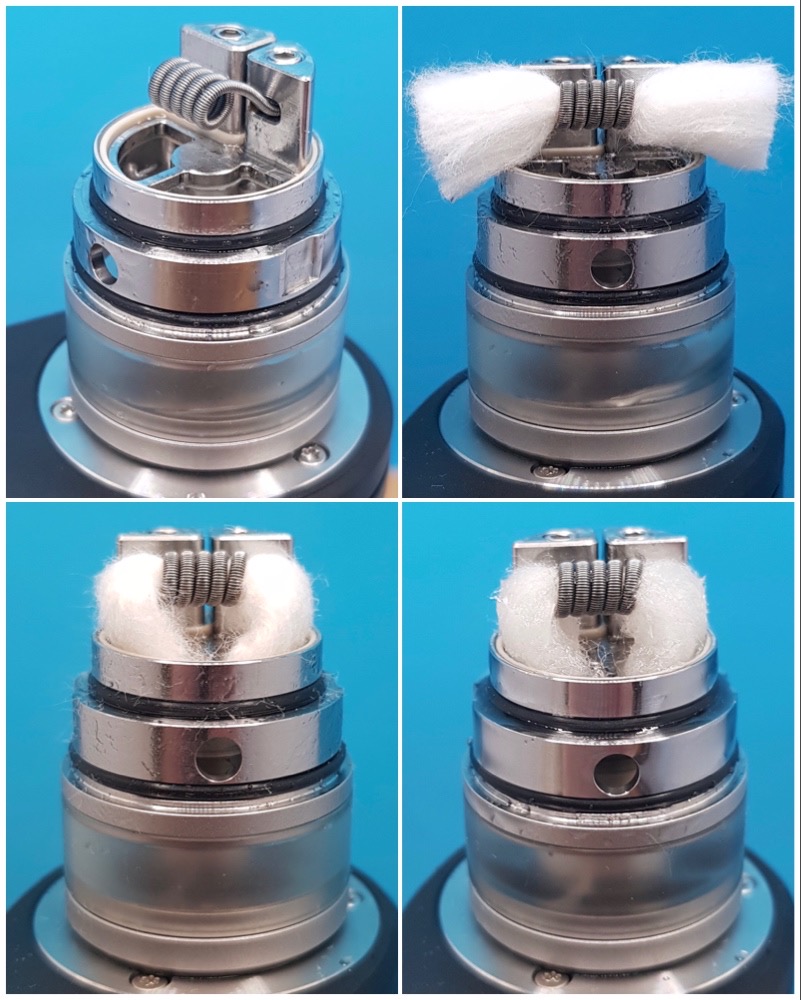
Time for a more rowdy build next, a kanthal fused clapton at 0.3ohms. I did exactly the same as the round wire build here but it took a few more primer puffs to get the cotton saturated, but it worked just as before. You can of course prime your wick as normal, and I've just done it this way as a demonstration of the technology in action.
This obviously needs a bit more power and I settled on 54 watts with three airflow holes open. This added another layer to the flavour as you would expect, and the wicking kept up with no issues once again. There’s quite a lot of metal in the top cap so if you chain hit this it will get warm but it’s not gotten to the point where I’ve been worried about burning my lips, in fact the top AFC locking ring remains fairly cool throughout.
One thing that often plagues RDTAs is that they tend to leak if laid on their side. With both of the builds above, I didn’t experience any of this but on a subsequent rewick I did, quite badly in fact. It’s critical here that you make sure that your wicks touch the top of the petal and fill the two wick ports. You don’t want to jam the cotton in, but just make sure everything is adequately covered by the wick and you’ll be fine, a quick rewick solved the problem and normal service was resumed.
Pros
- Unique Capillary System E-liquid Conduction Technology
- Easy to build
- Lots of extras
Cons
- You might need a couple of practice runs on the wicking
- Top cap sits up on the o-rings leaving a small gap
- Plastic tank section (metal alternate supplied)
Conclusion
The products from the Aspire Prestige line are always a little bit special, and the Aspire Kumo RDTA is no exception. The airflow is a direct lung hit all day long but there is a hint of restriction in play here even with the AFC fully open, this happens to be my preferred vaping style anyway so I’m as happy as Larry with this, and the flavour has been great with my fused clapton build. I’m most impressed by Steampipes Capillary System E-liquid Conduction Technology though, I was a little skeptical coming into this review but this has worked flawlessly. I’m not anticipating this being overly expensive either so this is one RDTA you might want to consider adding to your collection.
Many thanks to UK Aspire Vendor for sending the Aspire Prestige Kumo RDTA out for review.
Antony Lord
Reviewer at POTVI was a twenty a day smoker for 25 years and like most smokers I was always going to quit "next week". Having hit my mid forties and having the usual smokers cough and difficulty with anything more than moderate exercise it was obviously time to give up the cancer sticks. I bought my first e-cigarette in 2013 when they were expensive, difficult to find and quite frankly... crap. I used it for about a week then went back to the roll ups, mark up another failed quit attempt. The fact that I had just changed jobs and was under quite a lot of stress probably didn't help. Move on to 2016 and whilst I was browsing eBay I noticed that one of the suggested items that would occasionally pop up was for a cheap e-cigarette. It looked similar to the one I'd bought 3 years earlier but it was only £5 (about 8 times cheaper than before) so I decided to give it another go on a whim. Once the kit arrived I managed to gradually replace the cigarettes with my new kit over a two month period and got into watching YouTube reviews for newer kit. My cheap and cheerful kit was replaced by a more upmarket affair, and being a noob I made a mistake once it arrived... I put in the supplied direct lung coil, this was of course a complete revelation and I haven't touched a cigarette since. Oh and I no longer spend the first five minutes of every day having a coughing fit either.
Join the discussion

Hellvape Dead Rabbit MTL 2 RTA
Hellvape are still flying the flag for traditional rebuildable vapers, and Antony got his hands on the latest Dead Rabbit MTL 2 RTA
-
by Antony Lord
Hellvape Dead Rabbit 3 RTA 2024 Edition
Hellvape are flying the flag for rebuildable vape gear with the newly released Dead Rabbit 3 RTA 2024 Edition
-
by Antony Lord
Thunderhead Creations Tauren Boro Tank
Decent vaping doesn't have to cost the earth as Thunderhead Creations prove with the new Tauren Boro tank
-
by Antony Lord