jimmy1mc
Postman
- Joined
- Mar 4, 2014
- Messages
- 294
So I have 2 Taifun's at the moment (not FT but H-Cigar clones) and I went through loads of set-ups before I got what suited me best. I thought I'd post this up in case it helped anyone. I know there's loads of 'how to's' for this atti, but too lazy to see if this version has been done before  Obviously this may not be to everyone's liking, but works great for me, good flavour, big clouds, no leaking or gurgles. I only get the leaks with this set-up when the tank is practically empty and I'm being lazy and not filling it
 ")
I tried, SS #400 mesh with a ekowool 'flavour wick' to stop leaking, but not keen on SS taste tbh. Tried silica of all shapes and sizes (not big enough clouds), ekowool of all shapes and sizes (not keen on the taste either), a cotton wool chimney build which was pretty good, but not enough flavour and voodoo wool, which is my 2nd favourite, but for me cant beat a micro coil with cotton, which is what I use.
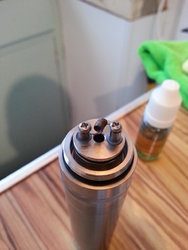
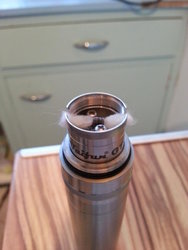
So 1st thing, I pull out the air tube and plastic insulator (for max air flow) and give the whole thing a cracking soak and wash, blowing through the air whole to make it all nice and clean. Wrap a micro coil (I use a little screw driver which is about 2mm), anyway, about 9 or 10 wraps to get 1.1 - 1.3 ohm's.
For 50/50 pg/vg, 60/40 pg/vg and 70/30 p/v (don't use anything with higher pg):
1. attach coil, tail sides down and make sure right over hole
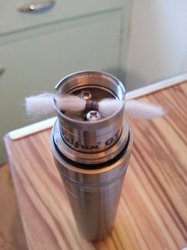
2. grab some organic cotton, tear off a pretty thin bit and tread it through the coil
3. slide the chimney bit on and get it all lined up in grooves and trim down the wick
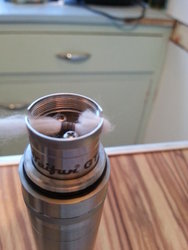
4. fold the ends of he cotton back on themselves so that it creates a loop, making sure the loop only pokes out about a mm and the other end does not touch the coil (do this for both sides)
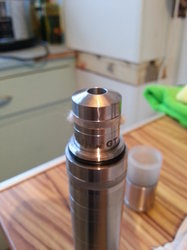
5. add some juice, no too much, and tidy up the ends a bit.
6. Chimney cap on
7. Tank on
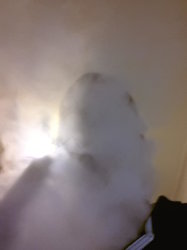
8. a few dry draws to get the juice onto the wick then big clouds!
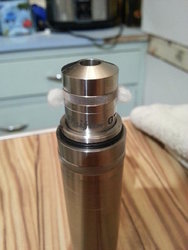
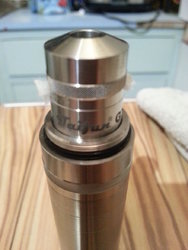
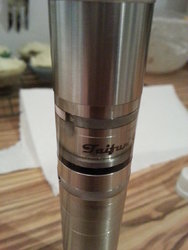
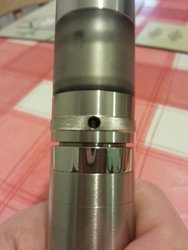
(pictures below correspond to stages)
Obviously this may not be to everyone's liking, but works great for me, good flavour, big clouds, no leaking or gurgles. I only get the leaks with this set-up when the tank is practically empty and I'm being lazy and not filling it I tried, SS #400 mesh with a ekowool 'flavour wick' to stop leaking, but not keen on SS taste tbh. Tried silica of all shapes and sizes (not big enough clouds), ekowool of all shapes and sizes (not keen on the taste either), a cotton wool chimney build which was pretty good, but not enough flavour and voodoo wool, which is my 2nd favourite, but for me cant beat a micro coil with cotton, which is what I use.
So 1st thing, I pull out the air tube and plastic insulator (for max air flow) and give the whole thing a cracking soak and wash, blowing through the air whole to make it all nice and clean. Wrap a micro coil (I use a little screw driver which is about 2mm), anyway, about 9 or 10 wraps to get 1.1 - 1.3 ohm's.
For 50/50 pg/vg, 60/40 pg/vg and 70/30 p/v (don't use anything with higher pg):
1. attach coil, tail sides down and make sure right over hole
2. grab some organic cotton, tear off a pretty thin bit and tread it through the coil
3. slide the chimney bit on and get it all lined up in grooves and trim down the wick
4. fold the ends of he cotton back on themselves so that it creates a loop, making sure the loop only pokes out about a mm and the other end does not touch the coil (do this for both sides)
5. add some juice, no too much, and tidy up the ends a bit.
6. Chimney cap on
7. Tank on
8. a few dry draws to get the juice onto the wick then big clouds!
(pictures below correspond to stages)
Attachments
-
 20140325_172653.jpg89.1 KB · Views: 646
 -
 20140325_172913.jpg89.3 KB · Views: 626
 -
 20140325_173225.jpg90.1 KB · Views: 639
 -
 20140325_173355.jpg89.7 KB · Views: 639
 -
 20140325_173622.jpg92.3 KB · Views: 642
 -
 20140325_174003.jpg87.7 KB · Views: 626
 -
 20140325_174326.jpg89.2 KB · Views: 611
 -
 20140325_175149.jpg54.2 KB · Views: 584
Last edited: