What's new
  • Due to active development, we've had to change the site cookie domain. If you're having any issues logging in, please try clearing your cookies for forum.planetofthevapes.co.uk and try again. Sorry for any inconvenience. The POTV Team

Steam Crave Aromamizer RDTA - quad coil build and much more!

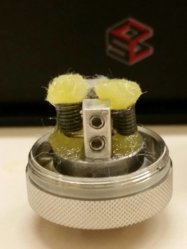
Final wick pics.. Not sure not sure how much would show up in the pics

Trimmed the top tails flush with the posts..

Am I right in thinking that once the wicks are wet you should tuck them in underneath the coils and try to cover as much of the deck as possible?


ImageUploadedByPlanet of the Vapes1448665014.453881.jpg


ImageUploadedByPlanet of the Vapes1448665066.397233.jpg


ImageUploadedByPlanet of the Vapes1448665100.497644.jpg
 
Fluff, tuck, spread, just touching the deck and no more, then juice. Are you going to be taking a couple of wraps off? :D
 
Just make sure all the cotton is inside the lip of the deck, don't prod around if you can avoid it.
I would separate the top tails with my prodder, to make sure there's a fully open airway between the coils.

Another thing to try next time .... don't juice up the wicks directly, just fill up the juice channel in the base around the deck ... leave it alone for 2 minutes whilst you fill up the tank and watch your wicks suck it up. Some people like watching paint dry, I love watching how well the wicking works. Sad huh?
 
Fluff, tuck, spread, just touching the deck and no more, then juice. Are you going to be taking a couple of wraps off? :D


Going to run a tank with this current build as it's quite late in the day.. I'll rebuild it tomorrow and follow your advice..

I have been wetting the wick and then tuck.. Think my wick might be too long if it is supposed to be just touching the deck
 
Just make sure all the cotton is inside the lip of the deck, don't prod around if you can avoid it.
I would separate the top tails with my prodder, to make sure there's a fully open airway between the coils.

Another thing to try next time .... don't juice up the wicks directly, just fill up the juice channel in the base around the deck ... leave it alone for 2 minutes whilst you fill up the tank and watch your wicks suck it up. Some people like watching paint dry, I love watching how well the wicking works. Sad huh?

Lol..

That sound like a good idea will defo give that a go next time.. Thanks

So do I fill up the juice channel and then tuck in the wick?
 
Going to run a tank with this current build as it's quite late in the day.. I'll rebuild it tomorrow and follow your advice..

I have been wetting the wick and then tuck.. Think my wick might be too long if it is supposed to be just touching the deck
Don't worry about it. We're just passing on advice we've learned from our own painful mistakes. In a day or two you'll be an RDTA master.
 
Thank you so much guys for all your fab advice.. Really appreciate it
 
Don't know if others do this too, but I break a new coil and wick in gradually ... don't go throwing 50+W at it from the off. What do you do @Mr Numpty @Vaped Crusader @Beastie ?
I usually start off at something like 15w and give it a few primer puffs each time a take a toke. A couple at that setting then up by 5w and repeat….I find it can take a while before it all settles down and starts hitting the spot. I do most of my vaping at 30-45w
 
Not read through the thread yet but this is how I've been building, very simple duel vertical 0.22 65w and vapes perfect.

Anyone one who wants a black one or 2 post deck, spare coloured glass etc see John at Boldvape
 

Attachments

  • 1448689248590.jpg
    1448689248590.jpg
    53.6 KB · Views: 83
Back
Top Bottom