You are using an out of date browser. It may not display this or other websites correctly.
You should upgrade or use an alternative browser.
You should upgrade or use an alternative browser.
Vivi Novas all reading 9.9ohms!!!
- Thread starter Woowoo
- Start date
Darthpistachio
Postman
- Joined
- Dec 12, 2012
- Messages
- 350
9.99 suggests infinite resistance - which means there is no active connection - contact is not being made between the positive pole on the vivi Nova and the vamo.
This suggest a problem with the vamo connection if it occurs on ALL your Vivi's
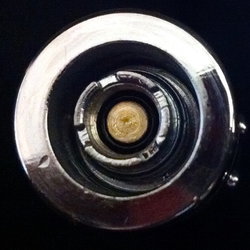
I have had to repair my Vamo - it's weakest link is the silicone grommet that resides underneath the positive connection. Over time and with atomisers that have positive connections that extend beyond 4.5mm this grommet will cut - become weak and this will lead to the positive pole being forced down and then not making contact with atomisers that have short connection distances - all the way to direct shorts with the vamo body itself and all the hassle that entails.
The fix IS easy but requires a bit of technical aptitude and some confidence - it involves pulling the positive connection OUT of the vamo - discarding the silicone grommet - possibly re-soldering the connector - insulating the pole with heat shrink or suitable tape - and applying a suitable nitrile or viton o-ring that will allow the use of atomisers with varying positive pole lengths with little hassle in future.
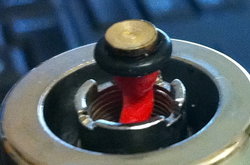
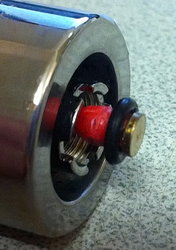
attached image shows the fixed connector that now accepts any atomiser of any connector length with no problems.
This WILL happen to ALL Vamo's in due time - I can guarantee that...

Woowoo
Achiever
- Joined
- Dec 8, 2012
- Messages
- 1,020
Can you recommend what to use/ where to get the bits for "insulating the pole with heat shrink or suitable tape - and applying a suitable nitrile or viton o-ring" - i think this may be the problem as I noticed this morning that the little clear o ring wasn't sat properly under the positive connection! 'tis ok - managed to find an o ring at work - will try replacing that tonight to see if that solves the problem! Darthpistachio - you may have just saved my sanity - I thank you!
Last edited:
ado28
Postman
- Joined
- Nov 23, 2012
- Messages
- 767
It would be good if you could make a guide for the "how to" section on this Darthpistachio 

V
Vaper Train
Guest
Video bellow how & what to use with eGo Style & other 510 connector no resistance / non firing issue (before you rip it apart & break the solder joint & or grommet)
Also these heads are they the same as the original ? as the vivi Nova copies (all that aren't Vision) have so many variants it could be that causing the issue.
Also these heads are they the same as the original ? as the vivi Nova copies (all that aren't Vision) have so many variants it could be that causing the issue.
Last edited by a moderator:
Darthpistachio
Postman
- Joined
- Dec 12, 2012
- Messages
- 350
- With a pointy tweezers lever up the positive pole - there will be a length of wire attached to it that should be able to let you pull the whole pole and wire out of the Vamo body by about 1/2-1".
- Then remove the silicone grommet. On my particular vamo the grommet had cut through and was allowing the positive pole to short against the negative body of the Vamo whenever an atomiser with a positive connector of greater than 4.45mm was fitted.. Whatever the reason the grommet is too thin to adequately do it's job properly - discard it.
- At this point I also discovered that my positive pole solder connection was pretty poor and the connection was held on by only a few strands of the electric wire - I cut the wire as close as possible to the actual positive pole.
- I then slid on some heat shrink tubing onto the wire and then prepared the pole and wire for re soldering.
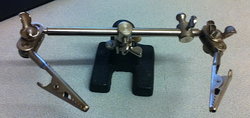
- The absolute safest way to do this is to mount the positive pole into a small clamp --- I used one of those helping hands devices as shown below.

- With a small torch heat up the positive pole in the clamp until you see the solder inside its base liquefy - then swiftly and carefully insert the prepared wire from the vamo body back into the base of the positive pole and hold still until the solder hardens again.
- Then slide the heat shrink up around the base of the pole and the wire connection up to the base of the top lip and carefully apply heat with a hot air gun or a hair dryer until the heat shrink does it's job.
- Alternatively wrap it once or twice with good quality insulating tape. It mustn't be too think as you have to still apply an o-ring underneath the top lip of the positive pole. just enough to provide good insulation.
- Put your o-ring underneath the top lip of the positive pole and then carefully push the whole assembly back into the top of the Vamo housing.
- When an atomiser is screwed on the whole assembly will be nicely compressed and will also prevent leaks from atomisers migrating inside the vamo body. This will eliminate all issues with atomiser connections and shorts from the positive pole against the vamo body.
- If you have a really leaky atomiser is is best to disconnect the atomiser form the vamo upside down so that pools of juice do not migrate into the Vamo body whilst you perform a clear up - although in general if you use the right o-ring it should seal nicely and hold itself in place when you remove the atomiser. I used a 3mm ID x 1.5 CS nitrile o-ring.


REMEMBER: If your wire connection is OK all you need to do is wrap the base of the positive pole with insulation and fit your o-ring.
Last edited:
Markfletcher007
Achiever
- Joined
- Aug 28, 2012
- Messages
- 4,156
- With a pointy tweezers lever up the positive pole - there will be a length of wire attached to it that should be able to let you pull the whole pole and wire out of the Vamo body by about 1/2-1".
- Then remove the silicone grommet. On my particular vamo the grommet had cut through and was allowing the positive pole to short against the negative body of the Vamo whenever an atomiser with a positive connector of greater than 4.45mm was fitted.. Whatever the reason the grommet is too thin to adequately do it's job properly - discard it.
- At this point I also discovered that my positive pole solder connection was pretty poor and the connection was held on by only a few strands of the electric wire - I cut the wire as close as possible to the actual positive pole.
- I then slid on some heat shrink tubing onto the wire and then prepared the pole and wire for re soldering.
- The absolute safest way to do this is to mount the positive pole into a small clamp --- I used one of those helping hands devices as shown below.
View attachment 4516
- With a small torch heat up the positive pole in the clamp until you see the solder inside its base liquefy - then swiftly and carefully insert the prepared wire from the vamo body back into the base of the positive pole and hold still until the solder hardens again.
- Then slide the heat shrink up around the base of the pole and the wire connection up to the base of the top lip and carefully apply heat with a hot air gun or a hair dryer until the heat shrink does it's job.
- Alternatively wrap it once or twice with good quality insulating tape. It mustn't be too think as you have to still apply an o-ring underneath the top lip of the positive pole. just enough to provide good insulation.
- Put your o-ring underneath the top lip of the positive pole and then carefully push the whole assembly back into the top of the Vamo housing.
- When an atomiser is screwed on the whole assembly will be nicely compressed and will also prevent leaks from atomisers migrating inside the vamo body. This will eliminate all issues with atomiser connections and shorts from the positive pole against the vamo body.
- If you have a really leaky atomiser is is best to disconnect the atomiser form the vamo upside down so that pools of juice do not migrate into the Vamo body whilst you perform a clear up - although in general if you use the right o-ring it should seal nicely and hold itself in place when you remove the atomiser. I used a 3mm ID x 1.5 CS nitrile o-ring.
View attachment 4517 View attachment 4518
That's a great walk through Darthpistachio, thank you
Woowoo
Achiever
- Joined
- Dec 8, 2012
- Messages
- 1,020
Swapped over the o ring and it has helped with some one them - thank you! Also, thanks Vaper Train - think they may not be original heads that are causing the issue also!!!


